

This article introduces the principle and usage of API gateway Apache APISIX native plugin
public-api.
Background Information#
Apache APISIX is a dynamic, real-time, high-performance API gateway that provides rich traffic management features such as load balancing, dynamic upstream, canary release, circuit breaking, authentication, observability, and more. As an API gateway, Apache APISIX not only has many useful plug-ins, but also supports dynamic plug-in change and hot plug.
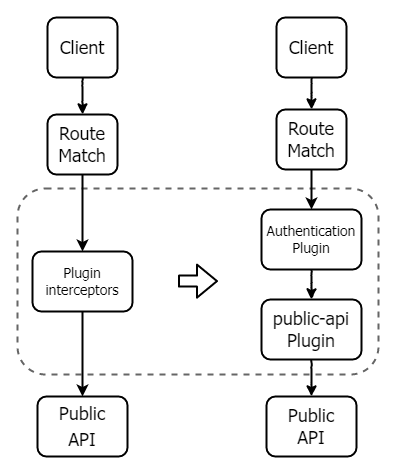
When users develop custom plugins in Apache APISIX, they can define some APIs (hereinafter referred to as: public API) for the plugins. For example, the jwt-auth plugin, which implements and provides the /apisix/plugin/jwt/sign interface for signing JWT, because this interface is not added through the Admin API, it can't be managed like a route.
In practical application scenarios, the provided interface is for internal calls, rather than being open on the public network for anyone to call. In order to deal with this scenario, Apache APISIX designed plugin-interceptors, which allows the public API to apply some plugins and implement request filtering, but currently only ip-restriction plugins are supported.
It can be seen from the above that Apache APISIX's ability to request public API for filtering is relatively weak, so it is impossible to use the other plugins in Apache APISIX to achieve complex authentication and authorization.
Therefore, Apache APISIX has designed a public-api plugin that replaces the limited functionality and complex use of plugin-interceptors. With this plugin, you can solve the pain points in using the public API. You can set a custom URI for the public API and configure any type of plugin. The following figure shows the changes before and after using public-api.
Initial Knowledge about public-api#
This section takes the /apisix/plugin/jwt/sign interface of the jwt-auth plugin as an example to introduce two usage methods and a scenario example of the public-api plugin.
Before using the public-api plugin, if the public API is registered using _M.api() in plugin development, APISIX will expose it by default and you can call it directly on the HTTP port. Now you need to manually create a route and configure the public-api plugin before you can forward the API to the public-api plugin.
Confirm Whether the API is Open#
You can request the API path by following the command below and return the result to see that /apisix/plugin/jwt/sign is not exposed by default and is not available.
curl -XGET 'http://127.0.0.1:9080/apisix/plugin/jwt/sign?key=user-key'
{"error_msg":"404 Route Not Found"}Prerequisites#
You need to create a Consumer and enable the jwt-auth plugin to perform the following steps.
For
jwt-authparameter configuration information in the example, you can refer to the Apache APISIX official documentation.
curl -XPUT 'http://127.0.0.1:9080/apisix/admin/consumers' \ -H 'X-API-KEY: <api-key>' \ -H 'Content-Type: application/json' \ -d '{ "username": "APISIX", "plugins": { "jwt-auth": { "key": "user-key", "algorithm": "HS256" } } }'Method 1: Basic Use#
- Create and configure a Route.
Create a Route based on the Consumer in the Prerequisites, set the uri to the API address where the JWT is issued in the jwt-auth plugin, and open the public-api plugin in the Route.
curl -XPUT 'http://127.0.0.1:9080/apisix/admin/routes/r1' \ -H 'X-API-KEY: <api-key>' \ -H 'Content-Type: application/json' \ -d'{ "uri": "/apisix/plugin/jwt/sign", "plugins": { "public-api": {} } }'- Test the Example.
You can test with the following command, and if you see that the result is a JWT string, this public API is ready to use.
    curl -XGET 'http://127.0.0.1:9080/apisix/plugin/jwt/sign?key=user-key'
<header>.<payload>.<signature>Method 2: Customize the Path#
Before using the public-api plugin, it is difficult for users to modify a uri that is open to the public API. Users of the prometheus plugin can customize the exporter uri by modifying the configuration file, but for other Apache APISIX plugins, this can only be done by modifying the plugin file, which is difficult and risky in a production environment.
Now you can use the public-api plugin to modify the uri that the public API is open to the outside world, with the following examples.
- Create and configure a Route.
Use the following command to modify the Route created in Method 1, set uri=/gen_token, and configure the original uri to the uri field in the public-api plugin.
curl -XPUT 'http://127.0.0.1:9080/apisix/admin/routes/r1' \ -H 'X-API-KEY: <api-key>' \ -H 'Content-Type: application/json' \ -d '{ "uri": "/gen_token", "plugins": { "public-api": { "uri": "/apisix/plugin/jwt/sign" } } }'- Test the Example.
The public API is normally accessible with the new uri.
    curl -XGET 'http://127.0.0.1:9080/gen_token?key=user-key'
<header>.<payload>.<signature>The public API can't be accessed using the old uri.
    curl -XGET 'http://127.0.0.1:9080/apisix/plugin/jwt/sign?key=user-key'
{"error_msg":"404 Route Not Found"}Scenario Example: Protecting Router#
This section describes how to use public-api plugin to address the business pain of plugin-interceptors plugin.
The following steps take the key-auth plugin as an example to show you how to use the public-api plugin to protect the public API.
For
jwt-authparameter configuration information in the example, you can refer to the Apache APISIX official documentation.
- Create and configure a Consumer.
Create Consumer and configure the key-auth key.
curl -XPUT 'http://127.0.0.1:9080/apisix/admin/consumers' \ -H 'X-API-KEY: <api-key>' \ -H 'Content-Type: application/json' \ -d '{ "username": "APISIX", "plugins": { "key-auth": { "key": "test-apikey" } } }'- Create and configure a Route.
Modify the route created in Method 2 and open the key-auth plugin and public-api plugin.
curl -XPUT 'http://127.0.0.1:9080/apisix/admin/routes/r1' \ -H 'X-API-KEY: <api-key>' \ -H 'Content-Type: application/json' \ -d '{ "uri": "/gen_token", "plugins": { "public-api": { "uri": "/apisix/plugin/jwt/sign" }, "key-auth": {} } }'- Test the Example.
After testing, when the request carries the correct apikey, the public API can respond normally. When the request does not carry the apikey, the 401 unauthenticated status code will be returned. If the returned results of your test are consistent with the sample status, it proves that the key-auth plugin you just configured has taken effect.
    # with corrent apikey    curl -XGET 'http://127.0.0.1:9080/gen_token?key=user-key'        -H "apikey: test-apikey"
    <header>.<payload>.<signature>
    # without apikey    curl -i -XGET 'http://127.0.0.1:9080/gen_token?key=user-key'
HTTP/1.1 401 UNAUTHORIZEDPrinciple Explanation#
From the above example, you can see that the public-api plugin can solve the defects of users when using the public API. This section introduces the implementation principle in detail.
The principle of public-api can be described in one sentence: the public-api plugin transfers the previous separate public API route matching to the plugin, and only performs public API matching for the routes that open the plugin. The following will explain the principle in detail from two aspects.
Before Using public-api Plugin#
First, you need to understand how Apache APISIX realizes the function of public API before integrating public-api plugin.
- When apisix starts, it will load the custom plugin and build a radiotree router using the route configuration obtained from etcd. It will be responsible for matching the route according to the request information and calling the correct
handlerto forward the request. - APISIX will create different routers for the public API of the custom plugin and the Route created by users respectively (hereinafter referred to as public API router and Route router).
- When a request arrives, it will be matched first by the public API router and then by the Route router. They are two completely separate parts in the request processing flow.
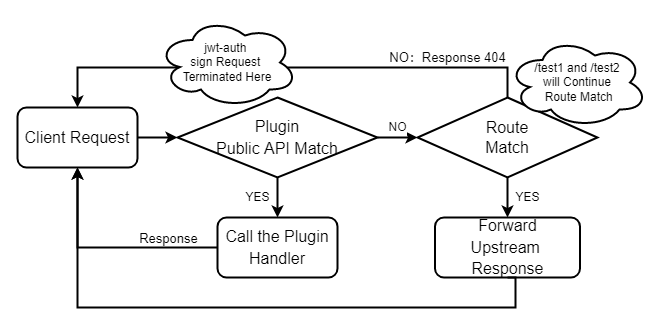
According to this process, if you want to apply the plugin for Route router to the public API router, you need to manually maintain a list of plugins and manually execute the plugin function after the public API router is matched. It can be seen that such an architecture is complex and difficult to maintain, and brings many problems, such as complex use (configuration based on plugin_metadata), coarse grained configuration (it is difficult to implement different policies for multiple public APIs provided in a plugin), etc.
After adding the public-api Plugin#
After Apache APISIX introduce the public-api plugin, the above process will be simplified and the public API router matching previously executed before Route router matching will be transferred to the plugin.
- When the request arrives, APISIX directly executes the Route router matching. When the corresponding route is found, the forwarding request is processed to the plugin.
- -When a route opens the
public-apiplugin, it will call the specified public API for request processing according to the plugin configuration, and the request forwarding will no longer be performed. The route without thepublic-apiplugin will not be processed.
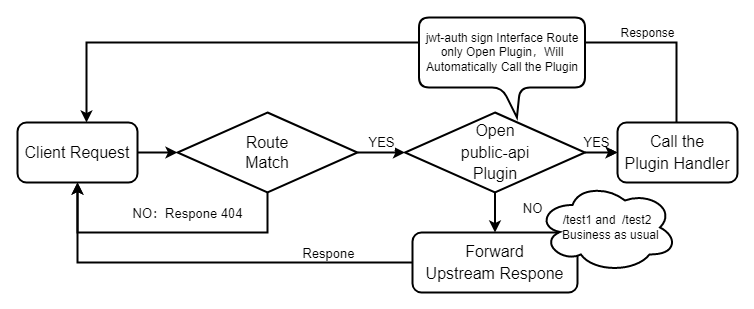
The public API provided by the user defined plugin will no longer be exposed by default. Instead, the user configures route to decide how to provide it. You can freely set routing parameters, such as uri, host, method, etc. after that, you only need to open the public-api plugin for routing.
Because the public-api plugin has a low priority, it will be executed after most plugins are executed, so that users can configure any authentication and security plugins for route.
Apache APISIX no longer performs the two stage Route route matching and performs different logic, all of which belong to Route routing matching, and the process of request processing is greatly simplified.
Summary#
You should note that after public-api is included in the official version release, Apache APISIX will no longer match the route of the public API in the HTTP request processing process of APISIX, that is, the public API registered in the plugin is not exposed by default. You can use the functions of the public API more flexibly through the use method of the public-api plugin.
This plug-in will be supported in
APISIX 2.13.0. If you have completed the development of custom plug-in beforeAPISIX 2.13.0, upgrading the version will affect your services. Please confirm again before upgrading.
To get more information about the public-api plugin description and full configuration list, you can refer to the Apache APISIX official documentation.
Apache APISIX is also currently working on additional plugins to support the integration of additional services, so if you are interested, feel free to start a discussion in GitHub Discussion, or via the mailing list to communicate.