

This article shows you step by step how to use Istio Service Mesh and Apache APISIX, to expose services in a Service Mesh-enabled Kubernetes cluster to the outside of the cluster through very detailed steps.
Service Mesh#
With the hot development of Cloud-Native technology, Service Mesh is gradually becoming popular in the microservices field. The popular implementations of Service Mesh are Istio and Linkerd.
The following diagram shows the schematic diagram of Service Mesh, which introduces Sidecar Proxy to complete the interconnection and communication between microservices.
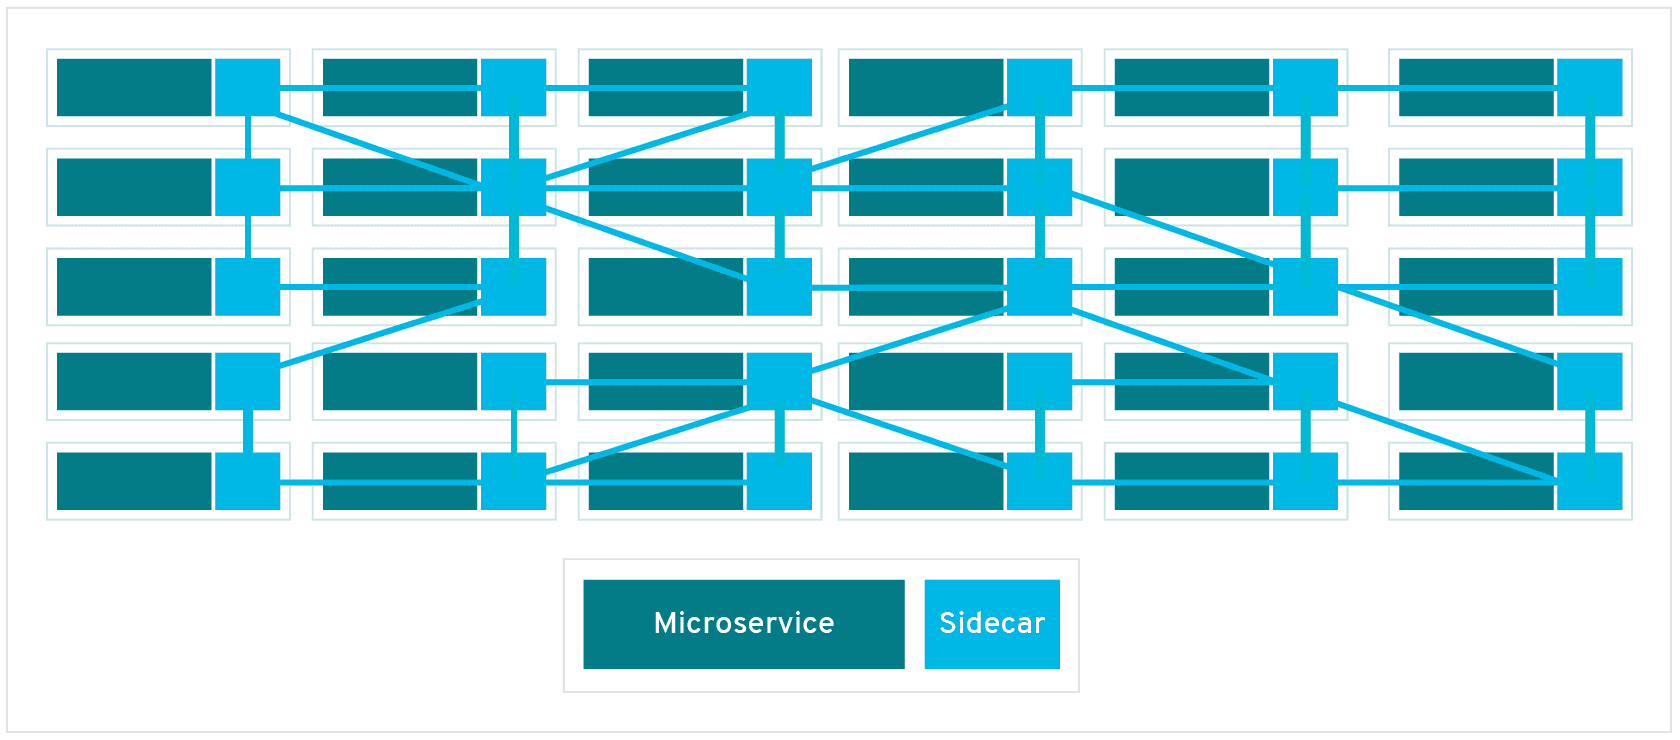
The diagram above shows that Service Mesh focuses more on east-west traffic in the traditional sense, i.e., traffic between services. When we use Service Mesh with Kubernetes, the east-west traffic corresponds to the traffic within the Kubernetes cluster.
Back in real-world usage scenarios, we won't only be exposed to traffic within the Kubernetes cluster, we will mostly need to expose some services outside of the cluster for users or other services to use. But when exposing services in a Kubernetes cluster outside the cluster, we have to consider factors such as security and observability.
We'll show you how to securely expose services in a Service Mesh-enabled Kubernetes cluster outside the cluster using Istio Service Mesh and Apache APISIX.

Step 1: Prepare the Kubernetes cluster#
Here we use Kind to create a temporary cluster locally for demonstration purposes. You can refer to the official documentation for how to install it with the Kind command.
Here is the yaml configuration file used to create the demo cluster, save it as kind-config.yaml.
kind: ClusterapiVersion: kind.x-k8s.io/v1alpha4nodes:- role: control-plane- role: worker- role: worker- role: workerThen use this configuration file to create a cluster.
(MoeLove) ➜ kind create cluster --config kind-config.yamlCreating cluster "kind" ... ✓ Ensuring node image (kindest/node:v1.22.2) 🖼 ✓ Preparing nodes 📦 📦 📦 📦   ✓ Writing configuration 📜 ✓ Starting control-plane 🕹️ ✓ Installing CNI 🔌 ✓ Installing StorageClass 💾 ✓ Joining worker nodes 🚜Set kubectl context to "kind-kind"You can now use your cluster with:
kubectl cluster-info --context kind-kind
Not sure what to do next? 😅 Check out https://kind.sigs.k8s.io/docs/user/quick-start/Step 2: Deploy Istio#
After the Kubernetes cluster is created, let's deploy Istio.
First, create a directory named apisix-istio and do the following after entering the directory.
(MoeLove) ➜ mkdir apisix-istio(MoeLove) ➜ cd apisix-istio(MoeLove) ➜ curl -sL https://istio.io/downloadIstio | sh -
Downloading istio-1.12.1 from https://github.com/istio/istio/releases/download/1.12.1/istio-1.12.1-linux-amd64.tar.gz ...
Istio 1.12.1 Download Complete!
Istio has been successfully downloaded into the istio-1.12.1 folder on your system.
Next Steps:See https://istio.io/latest/docs/setup/install/ to add Istio to your Kubernetes cluster.
To configure the istioctl client tool for your workstation,add the /root/apisix-istio/istio-1.12.1/bin directory to your environment path variable with:         export PATH="$PATH:/root/apisix-istio/istio-1.12.1/bin"
Begin the Istio pre-installation check by running:         istioctl x precheck
Need more information? Visit https://istio.io/latest/docs/setup/install/When the above operation is completed, a new directory will be created under the current directory. We can follow the output of the above command to continue the operation.
(MoeLove) ➜ lsistio-1.12.1(MoeLove) ➜ export PATH="$PATH:/root/apisix-istio/istio-1.12.1/bin"(MoeLove) ➜ istioctl x precheck✔ No issues found when checking the cluster. Istio is safe to install or upgrade! To get started, check out https://istio.io/latest/docs/setup/getting-started/Next, the real deployment process begins. Just set it to --set profile=minimal for a minimal installation.
(MoeLove) ➜ istioctl install --set profile=minimal  -y✔ Istio coreinstalled
✔ Istiodinstalled
✔ Installationcomplete
Making this installation the default for injection and validation.
Thank you for installing Istio 1.12. Please take a few minutes to tell us about your install/upgrade experience! https://forms.gle/FegQbc9UvePd4Z9z7Finally, check the current deployment status and you can see that the Pod is already running.
(MoeLove) ➜ kubectl -n istio-system get podsNAME READY STATUS RESTARTS AGEistiod-58d79b7bff-g66cv 1/1 Running 0 1mStep 3: Deploy Apache APISIX#
Next, we will deploy Apache APISIX.
First create a Namespace named apisix-istio and enable auto-injection.
(MoeLove) ➜ kubectl create ns apisix-istionamespace/apisix-istio created(MoeLove) ➜ kubectl label namespace apisix-istio istio-injection=enablednamespace/apisix-istio labeledNext, add Helm Repo and use Helm for Apache APISIX and Apache APISIX Ingress Controller deployments.
(MoeLove) ➜ helm repo add apisix https://charts.apiseven.com"apisix" has been added to your repositories(MoeLove) ➜ helm install apisix-istio apisix/apisix --set gateway.type=NodePort --set ingress-controller.enabled=true --set ingress-controller.config.apisix.serviceNamespace=apisix-istio --set ingress-controller.config.apisix.serviceName=apisix-istio-admin --namespace apisix-istioNAME: apisix-istioLAST DEPLOYED: Wed Dec 15 14:16:33 2021NAMESPACE: apisix-istioSTATUS: deployedREVISION: 1TEST SUITE: NoneNOTES:1. Get the application URL by running these commands: export NODE_PORT=$(kubectl get --namespace apisix-istio -o jsonpath="{.spec.ports[0].nodePort}" services apisix-istio-gateway) export NODE_IP=$(kubectl get nodes --namespace apisix-istio -o jsonpath="{.items[0].status.addresses[0].address}") echo http://$NODE_IP:$NODE_PORTAfter executing the above command, you can wait for all Pods to run normally by executing the following command.
(MoeLove) ➜ kubectl -n apisix-istio wait --for=condition=Ready pods --allpod/apisix-istio-7bdfcb4bd9-89jcn condition metpod/apisix-istio-etcd-0 condition metpod/apisix-istio-etcd-1 condition metpod/apisix-istio-etcd-2 condition metpod/apisix-istio-ingress-controller-5fcbb75b8c-b4nnc condition metYou can see that all the Pods are currently running properly. Next, let's test and verify.
Test Session#
Simple test#
When we deployed Apache APISIX using Helm earlier, we selected the service exposure method as NodePort, so we can then access Apache APISIX directly using the following command.
(MoeLove) ➜ export NODE_PORT=$(kubectl get --namespace apisix-istio -o jsonpath="{.spec.ports[0].nodePort}" services apisix-istio-gateway)(MoeLove) ➜ export NODE_IP=$(kubectl get nodes --namespace apisix-istio -o jsonpath="{.items[0].status.addresses[0].address}")(MoeLove) ➜ curl http://$NODE_IP:$NODE_PORT{"error_msg":"404 Route Not Found"}Note that when requesting with the curl command we add a -v option to look at the response headers of the request.
(MoeLove) ➜ curl -v http://$NODE_IP:$NODE_PORT* Rebuilt URL to: http://172.20.0.2:31225/* Trying 172.20.0.2...* TCP_NODELAY set* Connected to 172.20.0.2 (172.20.0.2) port 31225 (#0)> GET / HTTP/1.1> Host: 172.20.0.2:31225> User-Agent: curl/7.58.0> Accept: */*>< HTTP/1.1 404 Not Found< date: Wed, 15 Dec 2021 14:31:40 GMT< content-type: text/plain; charset=utf-8< server: istio-envoy< x-envoy-upstream-service-time: 1< x-envoy-decorator-operation: apisix-istio-gateway.apisix-istio.svc.cluster.local:80/*< transfer-encoding: chunked<{"error_msg":"404 Route Not Found"}* Connection #0 to host 172.20.0.2 left intactAs you can see from the above output, the response header contains the following.
< server: istio-envoy< x-envoy-upstream-service-time: 1< x-envoy-decorator-operation: apisix-istio-gateway.apisix-istio.svc.cluster.local:80/*This means that Istio's auto-injection has succeeded, and that it is not Apache APISIX but Istio's Sidecar that is currently interacting directly.
BookInfo Deployment Testing#
Next, we use Istio's own BookInfo sample application to perform the relevant tests.
First, create a Namespace and enable Istio's auto-injection.
(MoeLove) ➜ kubectl create ns bookinfonamespace/bookinfo created(MoeLove) ➜ kubectl label namespace bookinfo istio-injection=enablednamespace/bookinfo labeledBookInfo deployment is then performed and the relevant deployment files are automatically created in the directory during the above-mentioned Istio installation.
(MoeLove) ➜ kubectl -n bookinfo apply -f istio-1.12.1/samples/bookinfo/platform/kube/bookinfo.yamlservice/details createdserviceaccount/bookinfo-details createddeployment.apps/details-v1 createdservice/ratings createdserviceaccount/bookinfo-ratings createddeployment.apps/ratings-v1 createdservice/reviews createdserviceaccount/bookinfo-reviews created`deployment.apps/reviews-v1 createddeployment.apps/reviews-v2 createddeployment.apps/reviews-v3 createdservice/productpage createdserviceaccount/bookinfo-productpage createddeployment.apps/productpage-v1 createdWait for all Pods to run normally.
(MoeLove) ➜ kubectl -n bookinfo get podsNAME READY STATUS RESTARTS AGEdetails-v1-96cf758d8-qr6p9 2/2 Running 0 64sproductpage-v1-5f75dfbfb-22hcw 2/2 Running 0 64sratings-v1-779dbc4fdd-jt5zp 2/2 Running 0 64sreviews-v1-ffbbf7fc8-kxvrr 2/2 Running 0 64sreviews-v2-54546c6f84-pnjkn 2/2 Running 0 64sreviews-v3-74d6bf84cd-h4r9z 2/2 Running 0 63sNow we can use Apache APISIX to expose the service outside the Kubernetes cluster. Create a routing configuration using the following and save it as productpage-ar.yaml.
apiVersion: apisix.apache.org/v2beta2kind: ApisixRoutemetadata: name: productpagespec: http: - name: rule1 match: hosts: - apisix-istio.dev paths: - /* backends: - serviceName: productpage servicePort: 9080note
The above configuration can be interpreted as creating a route with the domain name apisix-istio.dev and forwarding all request traffic to port 9080 of the productpage service.
Then create this resource.
(MoeLove) ➜ kubectl -n bookinfo apply -f productpage-ar.yamlapisixroute.apisix.apache.org/productpage createdRequest Apache APISIX again with the domain name we just configured, and you will see that a 200 related prompt is returned.
(MoeLove) ➜ curl -I -H "HOST: apisix-istio.dev" http://$NODE_IP:$NODE_PORT/HTTP/1.1 200 OKcontent-type: text/html; charset=utf-8content-length: 1683date: Wed, 15 Dec 2021 15:47:30 GMTx-envoy-upstream-service-time: 7server: istio-envoyx-envoy-decorator-operation: apisix-istio-gateway.apisix-istio.svc.cluster.local:80/*The Apache APISIX port can then be exposed via port-forward.
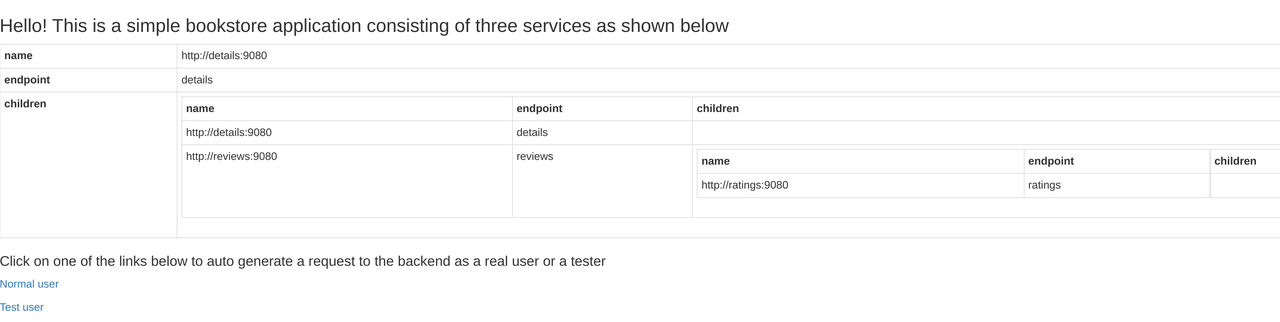
(MoeLove) ➜ kubectl -n apisix-istio port-forward --address 0.0.0.0 svc/apisix-istio-gateway 8080:80Forwarding from 0.0.0.0:8080 -> 9080Finally, set the Header of HOST: apisix-istio.dev in your browser and try to make a request, you will get the correct page as shown below.
Visualization tool: Kiali#
Kiali is a tool that allows visualization of Istio and can be installed as an Istio add-on.
It is deployed here directly using the configuration files in the addons directory carried by Istio.
(MoeLove) ➜ kubectl -n istio-system apply -f istio-1.12.1/samples/addons/serviceaccount/grafana createdconfigmap/grafana createdservice/grafana createddeployment.apps/grafana createdconfigmap/istio-grafana-dashboards createdconfigmap/istio-services-grafana-dashboards createddeployment.apps/jaeger createdservice/tracing createdservice/zipkin createdservice/jaeger-collector createdserviceaccount/kiali createdconfigmap/kiali createdclusterrole.rbac.authorization.k8s.io/kiali-viewer createdclusterrole.rbac.authorization.k8s.io/kiali createdclusterrolebinding.rbac.authorization.k8s.io/kiali createdrole.rbac.authorization.k8s.io/kiali-controlplane createdrolebinding.rbac.authorization.k8s.io/kiali-controlplane createdservice/kiali createddeployment.apps/kiali createdserviceaccount/prometheus createdconfigmap/prometheus createdclusterrole.rbac.authorization.k8s.io/prometheus createdclusterrolebinding.rbac.authorization.k8s.io/prometheus createdservice/prometheus createddeployment.apps/prometheus createdWait for the normal operation of Pod to view:
(MoeLove) ➜ kubectl -n istio-system get podsNAME READY STATUS RESTARTS AGEgrafana-6ccd56f4b6-wq6k5 1/1 Running 0 2m12sistiod-58d79b7bff-g66cv 1/1 Running 0 42mjaeger-5d44bc5c5d-84ksf 1/1 Running 0 2m11skiali-79b86ff5bc-w457g 1/1 Running 0 2m3sprometheus-64fd8ccd65-2mjcc 2/2 Running 0 2m9sNext, execute the following command to port-forward Kiali and access it in the browser. Of course, you can do the same thing with the above port-forward.
(MoeLove) ➜ istioctl dashboard kiali --address 0.0.0.0 --port 9999 --browser=falsehttp://0.0.0.0:9999/kialiskipping opening a browserOpen http://0.0.0.0:9999/kiali in your browser and try to access the BookInfo service via Apache APISIX several times to see the following results.
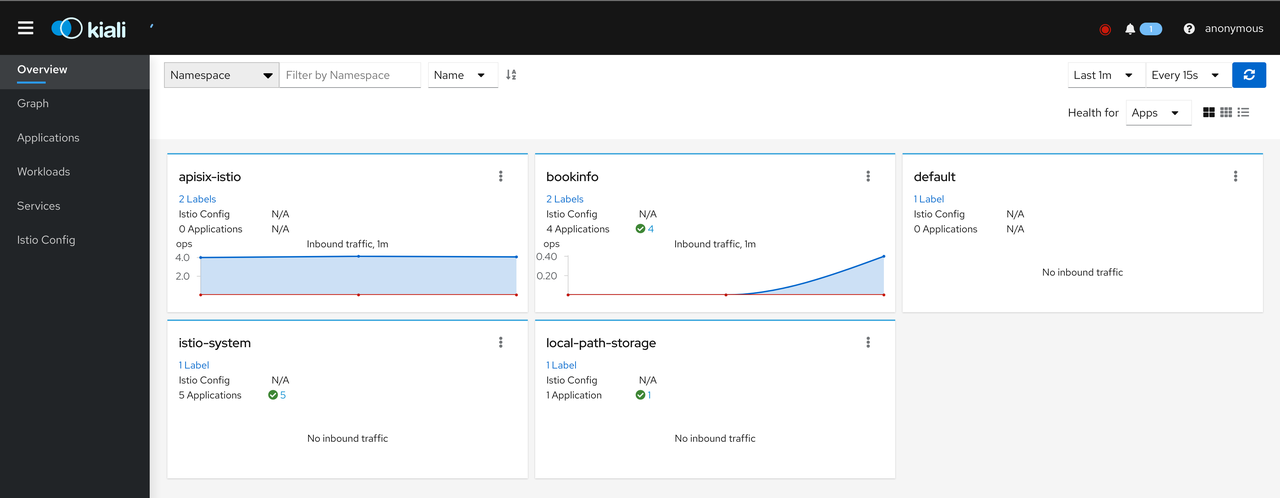
Click Graph and select Namespace as BookInfo. During the test to access the BookInfo application, you can see the effect shown below. You can see the traffic coming in from the Apache APISIX and then flowing to the various components of the application.
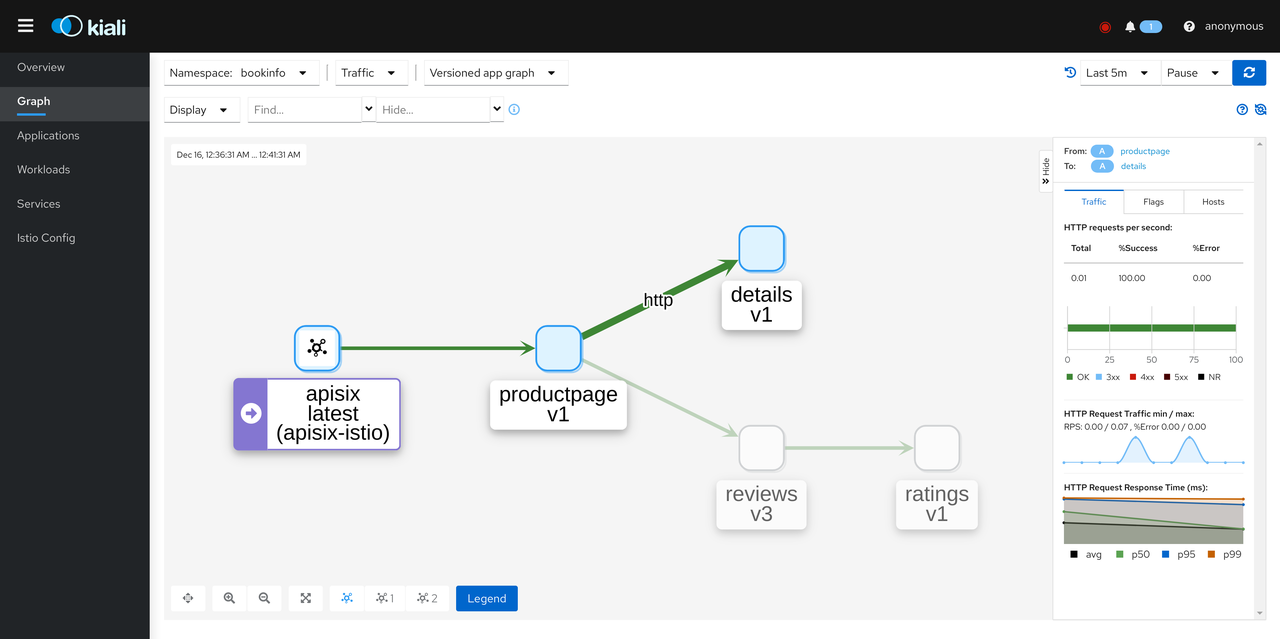
This concludes the entire process. We have successfully exposed the services in the Kubernetes cluster with Service Mesh enabled using Apache APISIX and Apache APISIX Ingress Controller securely.
Summary#
This article shows you step-by-step how to use Istio Service Mesh and Apache APISIX to expose the services in a Service Mesh-enabled Kubernetes cluster to the outside of the cluster in a very detailed step-by-step manner. You can also provide more security or traffic control through the rich plug-in capabilities of Apache APISIX in the future.
We hope that the above detailed tutorials will help you to more easily integrate with solutions such as Istio when using Apache APISIX.