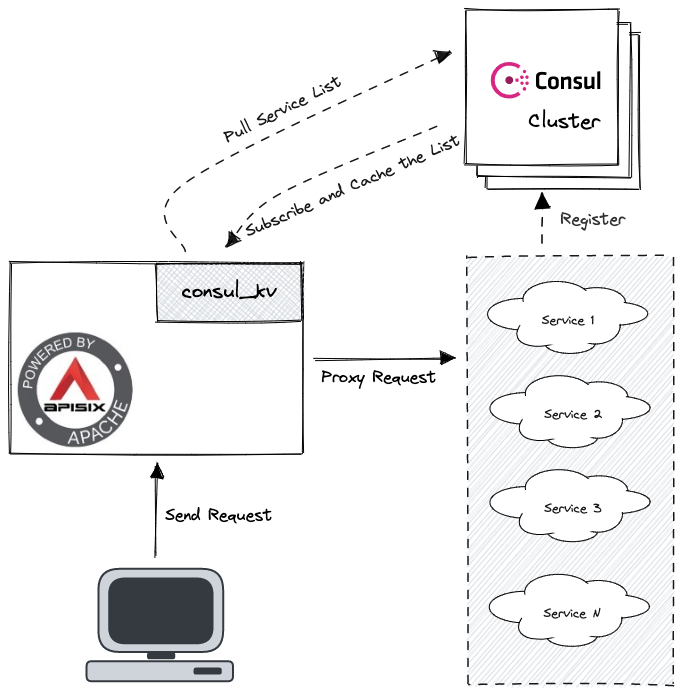
Apache APISIX supports the Consul KV-based service discovery registry. This article will walk you through the process of implementing service discovery and service registry in Apache APISIX.
Background Information#
Apache APISIX is a dynamic, real-time, high-performance API gateway.
APISIX provides rich traffic management features such as load balancing, dynamic upstream, canary release, circuit breaking, authentication, observability, and more.
Consul is a service mesh solution. One of its cores, Consul KV, is a distributed key-value database whose primary purpose is to store configuration parameters and metadata, while also allowing users to store indexed objects.
In the microservice architecture model, when the upstream services change due to capacity expansion, hardware failure, etc., the way to maintain the upstream service information by manually writing the configuration can lead to a steep increase in maintenance cost. In response, Apache APISIX provides a service discovery registry to dynamically obtain the latest service instance information to reduce the maintenance cost for users.
Currently, Apache APISIX supports the Consul KV-based service discovery registry with the consul_kv module contributed by the community.
How It Works#
Apache APISIX leverages the consul_kv module of the Consul KV distributed key-value storage capability to decouple the provider and consumer of a service and implement the two core functions of a service discovery registry.
- Service registration: Service providers register their services with the registry.
- Service Discovery: Service consumers find the routing information of service providers through the registry.
Built on this foundation, Apache APISIX will be more flexible and adaptable to existing microservice architectures to better meet user needs.

How to Enable Consul in Apache APISIX#
The test environments in this article are built in Docker using docker-compose.
Download Apache APISIX.
# Pull the Git repository of apisix-dockergit clone https://github.com/apache/apisix-docker.gitCreate Consul folder and configuration files.
# Create Consul foldermkdir -p ~/docker-things/consul/ && cd "$_"# Create configuration filestouch docker-compose.yml server1.jsonEdit the
docker-compose.ymlfile.version: '3.8' services: consul-server1: image: consul:1.9.3 container_name: consul-server1 restart: always volumes: - ./server1.json:/consul/config/server1.json:ro networks: - apisix ports: - '8500:8500' command: 'agent -bootstrap-expect=1' networks: apisix: external: true name: example_apisixEdit the
server1.jsonfile.{ "node_name": "consul-server1", "server": true, "addresses": { "http": "0.0.0.0" }}Add Consul-related configuration information to the Apache APISIX configuration file
apisix_conf/config.yaml.# config.yml# ...other configdiscovery: consul_kv: servers: - "http://consul-server1:8500" prefix: "upstreams"Start Apache APISIX and Consul.
# Go to the example, consul folder, start APISIX and Consuldocker-compose up -dRegister the test service to Consul. example contains two web services that you can use directly to test.
# Check the docker-compose.yml of the example# You can see two Web services$ cat docker-compose.yml | grep web# Outputsweb1: - ./upstream/web1.conf:/etc/nginx/nginx.confweb2: - ./upstream/web2.conf:/etc/nginx/nginx.confConfirm the IP addresses of these Web services.
$ sudo docker inspect -f='{{.Name}} - {{range .NetworkSettings.Networks}}{{.IPAddress}}{{end}}' $(sudo docker ps -aq) | grep web# Outputs/example-web1-1 - 172.26.0.7/example-web2-1 - 172.26.0.2Make a request to Consul's HTTP API in the terminal to register the test service.
# Register with the corresponding IPcurl \ -X PUT \ -d ' {"weight": 1, "max_fails": 2, "fail_timeout": 1}' \ http://127.0.0.1:8500/v1/kv/upstreams/webpages/172.26.0.7:80 curl \ -X PUT \ -d ' {"weight": 1, "max_fails": 2, "fail_timeout": 1}' \ http://127.0.0.1:8500/v1/kv/upstreams/webpages/172.26.0.2:80The path after
/v1/kv/follows the format{Prefix}/{Service Name}/{IP}:{Port}.{Prefix}is the prefix written when configuring Consul in APISIX, while{Service Name}and{IP}:{Port}need to be determined by the user according to the upstream service.The format of the data is
{"weight": <Num>, "max_fails": <Num>, "fail_timeout": <Num>}.Check whether the test service is registered successfully.
$ curl "http://127.0.0.1:8500/v1/kv/upstreams/webpages?keys"The following return message indicates successful registration.
["upstreams/webpages/172.26.0.2:80","upstreams/webpages/172.26.0.7:80"]%
Create a Route and Enable Consul#
Add Consul to the route using the Admin API provided by Apache APISIX.
The X-API-KEY and upstream.service_name need to be determined before adding them.
X-API-KEY: For the Admin API access token, in this example, we use the defaultedd1c9f034335f136f87ad84b625c8f1.upstream.service_name: The name of the upstream service, which specifies the service in a registry that will be bound to a route, should be set to the URL used to register the test service when using Consul, and the{IP}:{Port}part should be removed at the end. We can also use the Memory Dump API provided by Apache APISIX to get the URL of the service and confirm whether the upstream service is discovered properly.
$ curl http://127.0.0.1:9092/v1/discovery/consul_kv/dump | jq# Output{ "services": { # This key is the required URL "http://consul-server1:8500/v1/kv/upstreams/webpages/": [ { "port": 80, "host": "172.26.0.7", "weight": 1 }, { "port": 80, "host": "172.26.0.2", "weight": 1 } ] }, "config": { # ...configs }}Add a Route#
Here the request with URL /consul/* is routed to http://consul-server1:8500/v1/kv/upstreams/webpages/. Also, the discovery_type must be set to consul_kv to start the corresponding module.
curl http://127.0.0.1:9080/apisix/admin/routes -H 'X-API-KEY: edd1c9f034335f136f87ad84b625c8f1' -X POST -d '{ "uri": "/consul/*", "upstream": { "service_name": "http://consul-server1:8500/v1/kv/upstreams/webpages/", "type": "roundrobin", "discovery_type": "consul_kv" }}'Test and Verify the Result#
The request results show that the new route in Apache APISIX has been able to find the correct service address through Consul and request it to both nodes based on the load balancing policy.
# the first requestcurl -s http://127.0.0.1:9080/consul/# Outputhello web1%
# the second requestcurl -s http://127.0.0.1:9080/consul/# Outputhello web2%
# Note: It is also possible that both requests will return# the same result as web1 or web2.# This is caused by the nature of load balancing and# you can try to make more requests.Summary#
The first half of this article describes how Apache APISIX works with Consul to implement the Consul KV-based service discovery registry to solve the problem of service information management and maintenance. The second half of this article focuses on how to use Apache APISIX in Docker with Consul. Of course, the application in the actual scenario needs to be analyzed according to the business scenario and the existing system architecture.
More instructions on using the Consul registry in Apache APISIX can be found in the official documentation.
Apache APISIX is also currently working on additional plugins to support the integration of additional services, so if you are interested, feel free to start a discussion in GitHub Discussion, or via the mailing list to communicate.

