

This article will explain how to configure and use the Google Cloud Logging service in Apache APISIX.
Logging is an important infrastructure for distributed systems. It can help developers observe the status of service operation, improve the efficiency of service troubleshooting and diagnosis, and conduct multi-dimensional analysis to improve the overall stability and operational efficiency of the system.
Google Cloud Logging is a real-time log management service provided by Google Cloud, offering EB-level storage, search, analysis, and alerting services. Google Cloud Logging's log browser allows you to search, sort, and analyze logs easily and efficiently, and Google Cloud Logging also provides saved queries and rich graphical features to make log screening results retrievable and more intuitive.
Apache APISIX has previously supported the integration of HTTP Logger , TCP Logger, Kafka Logger, UDP Logger, RocketMQ Logger, SkyWalking Logger, Aliyun Cloud Logging(SLS) and many other open source and cloud logging service solutions.
Recently, Apache APISIX has also added support for Google Cloud Logging, giving users a new logging solution when using Apache APISIX as a gateway: use google-cloud-logging to forward Apache APISIX request logs to the Google Cloud Logging service for analysis and storage.
When the plugin is enabled, Apache APISIX will take the request context information in Log Phase and serialize it into Google Cloud Logging's LogEntry, then submit the serialized log data to the batch queue, and when the batch queue triggers a user-set time or entry threshold, the log data will be forwarded to Google Cloud Logging service via Google Cloud API to the Google Cloud Logging service.
This article will explain how to configure and use the Google Cloud Logging service in Apache APISIX.
Configure Google Cloud#
- Open your browser and visit Google Cloud Homepage.
- Enter your username and password to log in to the Google Cloud console.
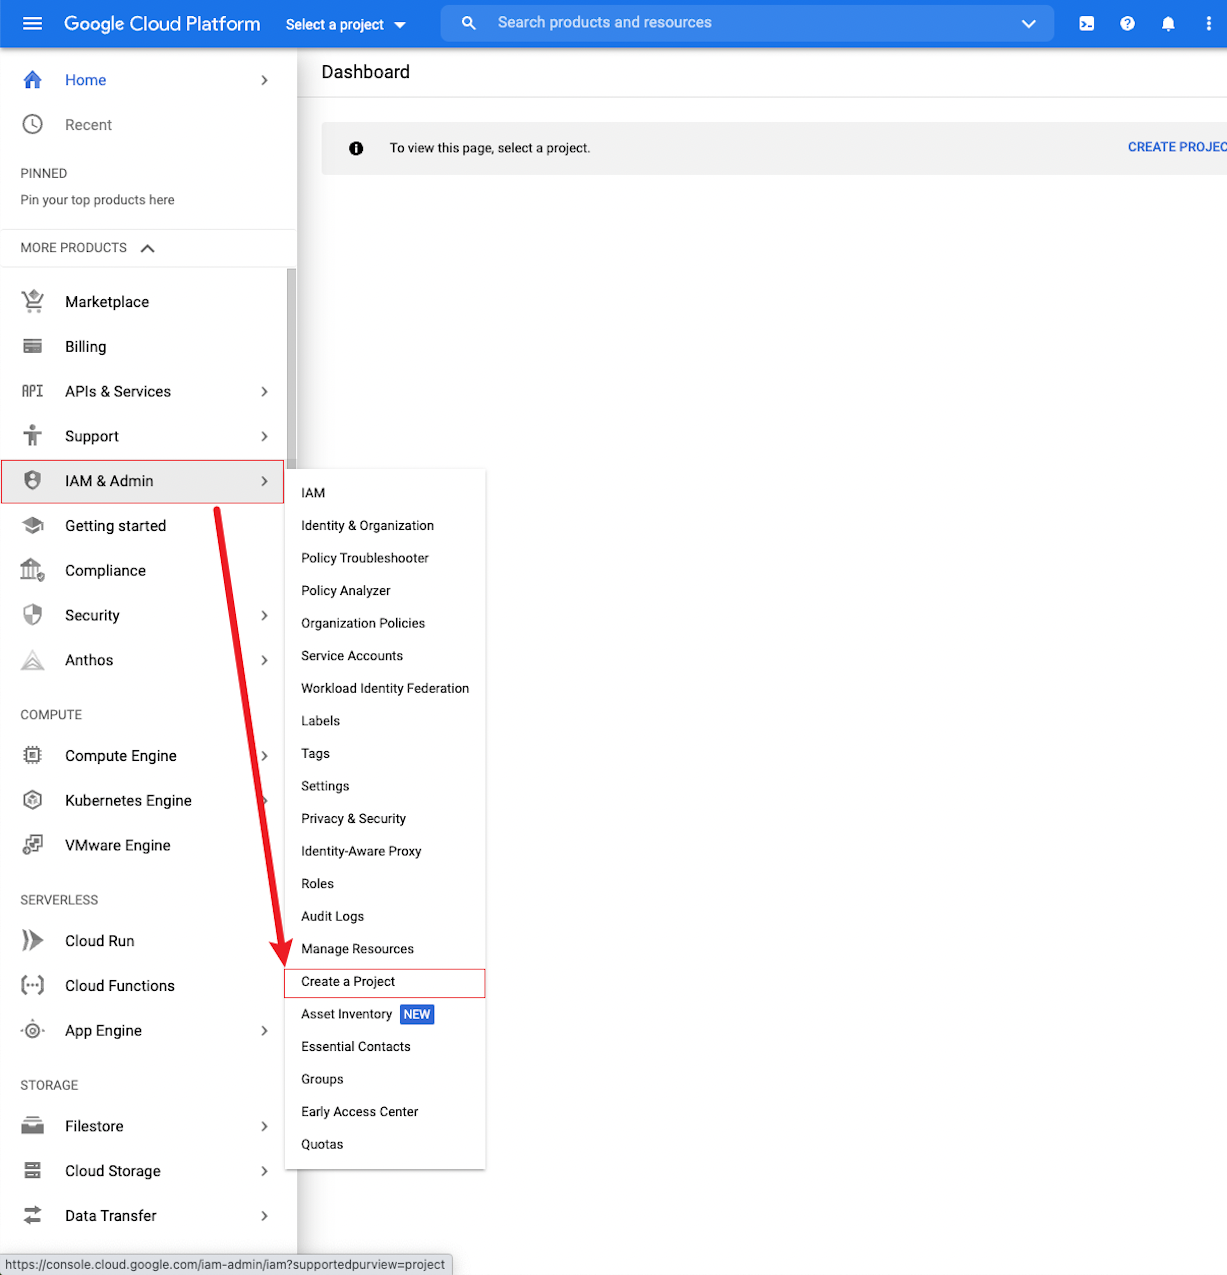
- Click the Google Cloud console left menu and select "IAM & Admin > Create a Project" to start creating a project.
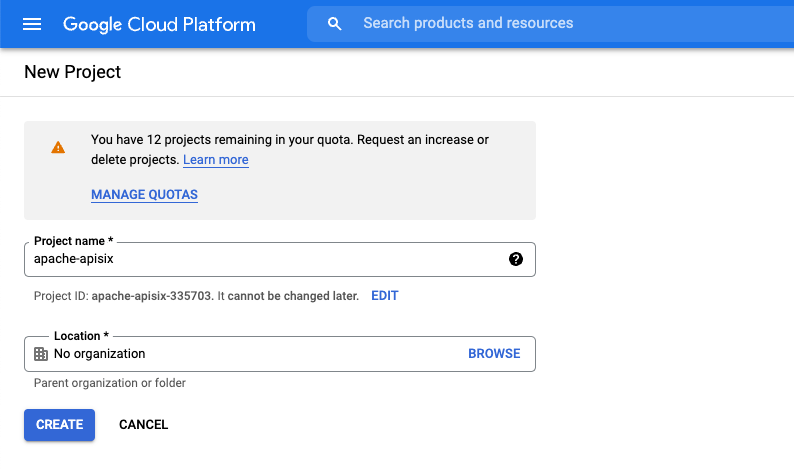
- Enter a project name, select an organization name, and click "CREATE" to create the project.
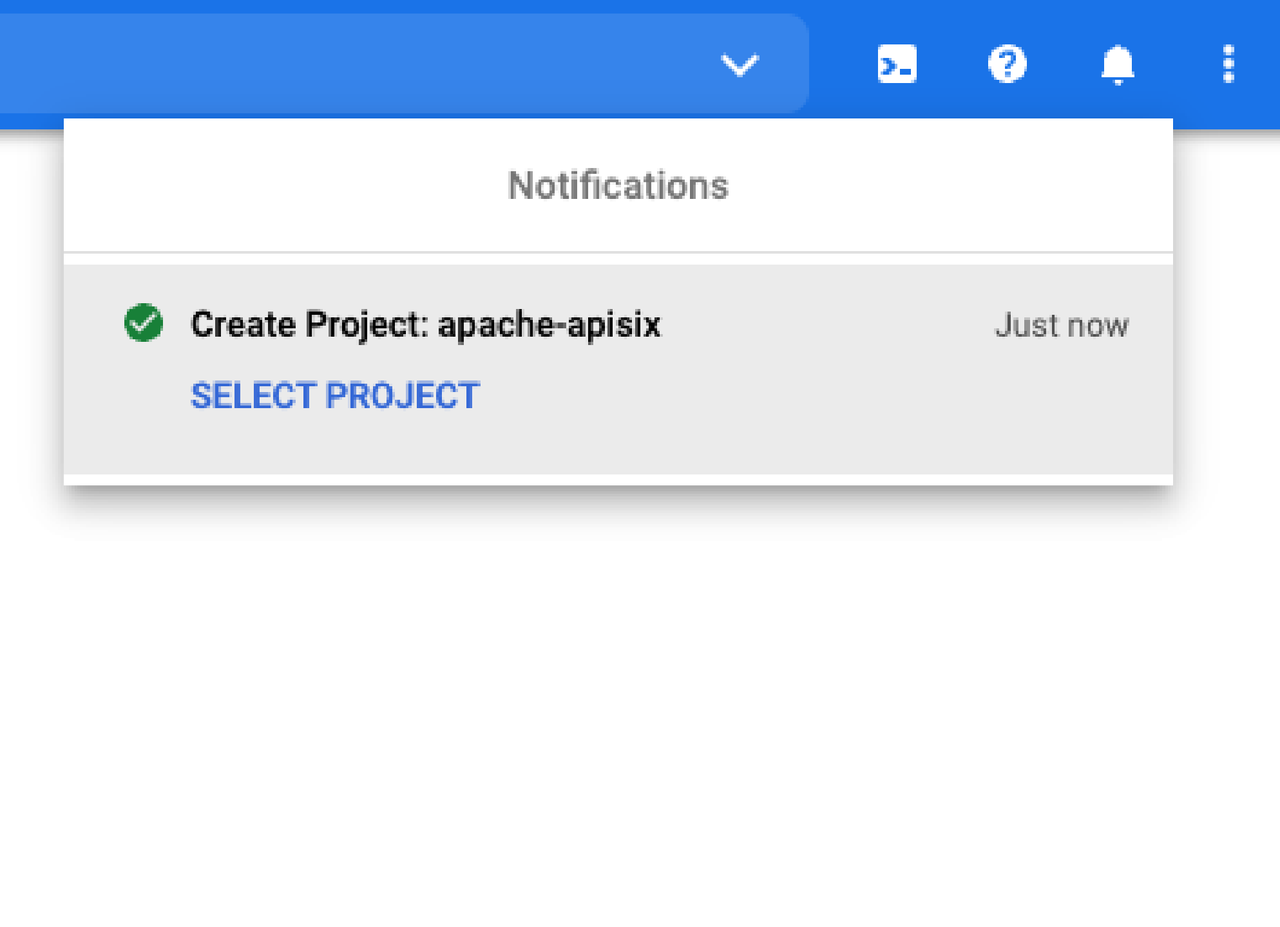
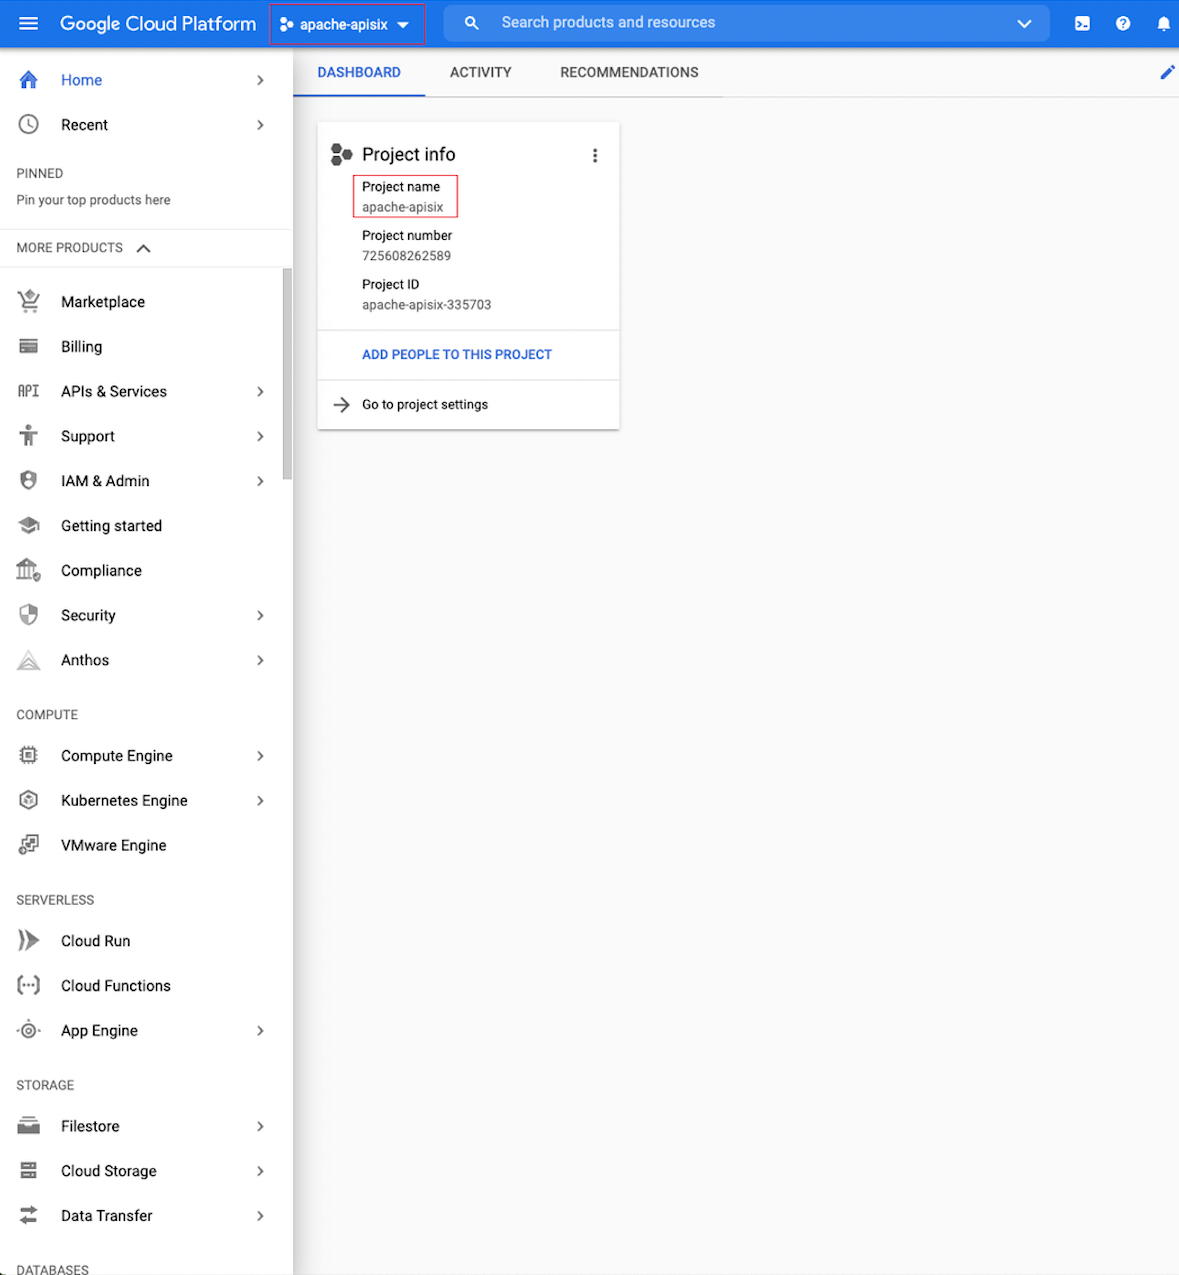
- When the project is created successfully, the top right corner of the console indicates that the creation was successful.
- Click in the window to select the project, or select the project operation path in the top navigation bar of the console home page. After selecting the project, you will be redirected to the console home page, where you can already see the data about the current project in the top navigation bar and the project information in the information center.
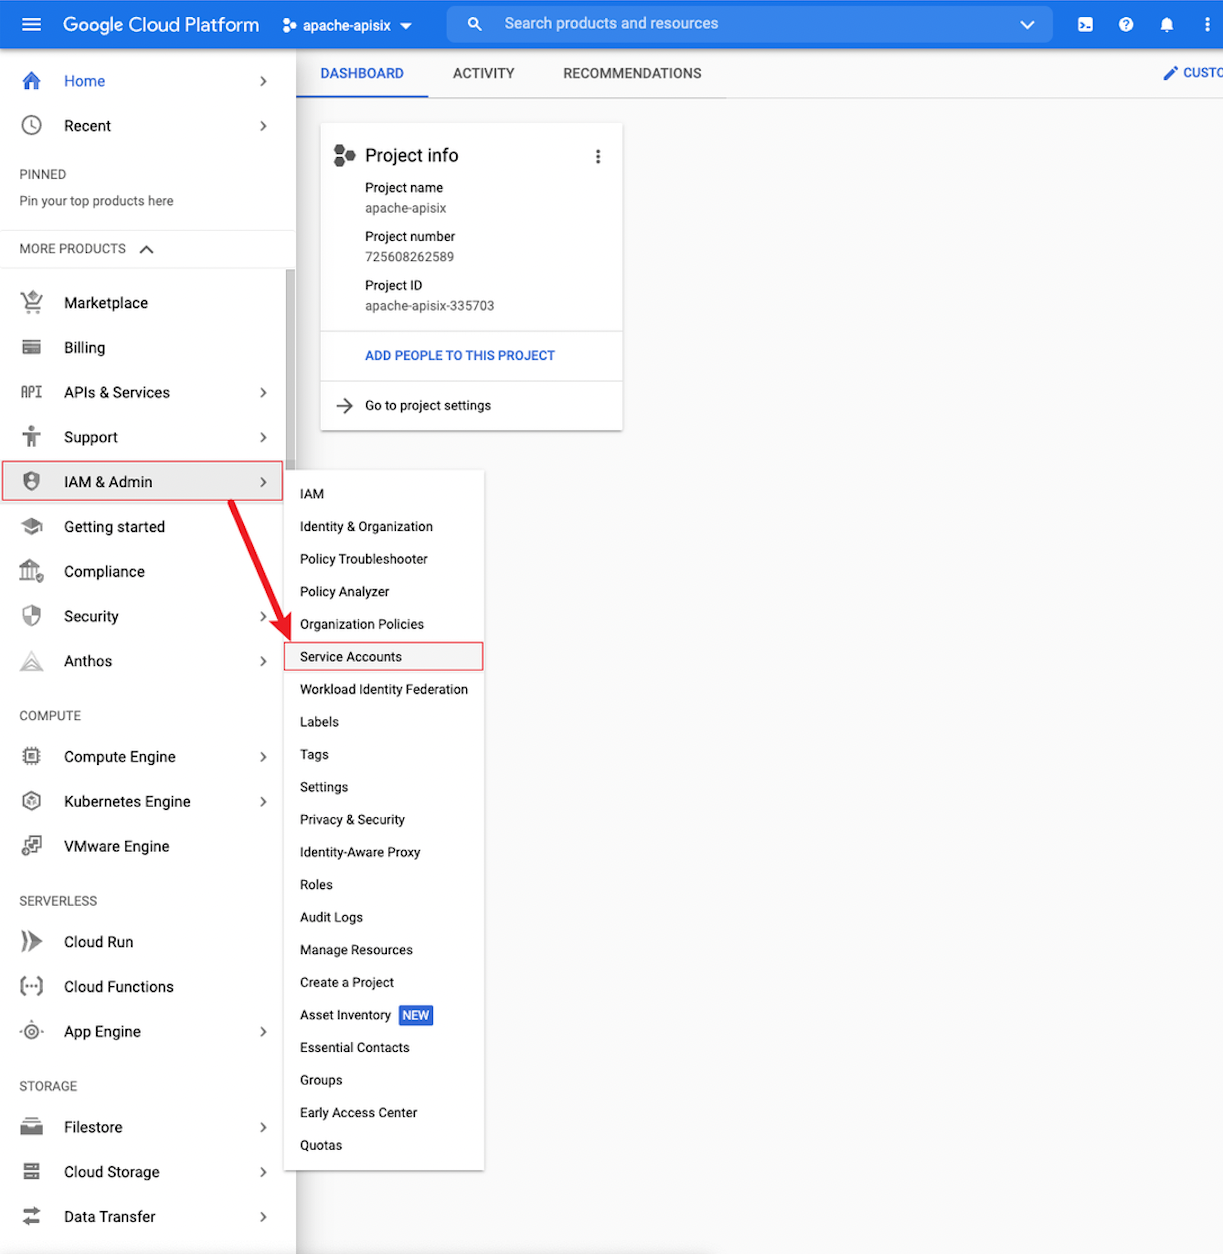
- After you finish creating the project, you need to create a service account for the project. Please go back to the Google Cloud console home page and click "IAM & Admin > Service Account" on the left menu to start creating a service account.
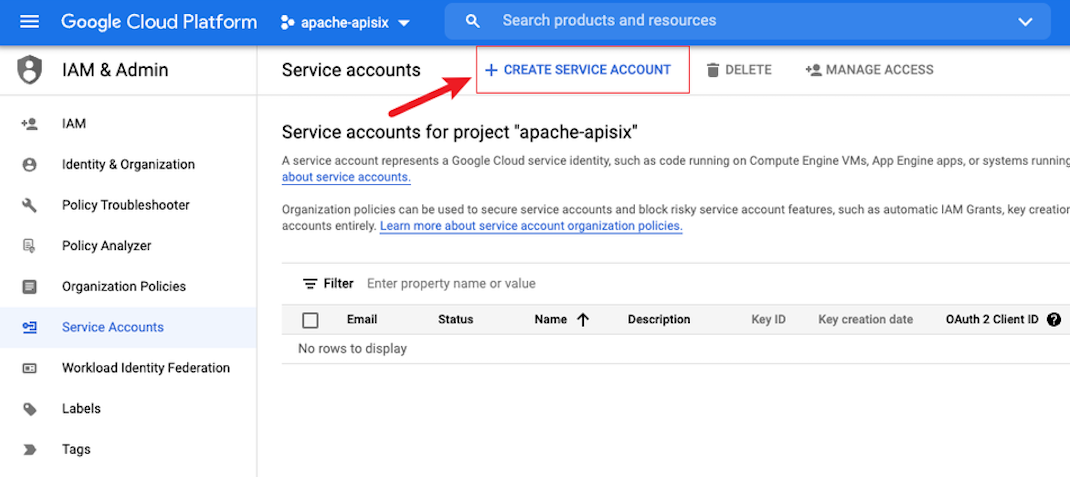
- Click "CREATE SERVICE ACCOUNT" to create the service account.
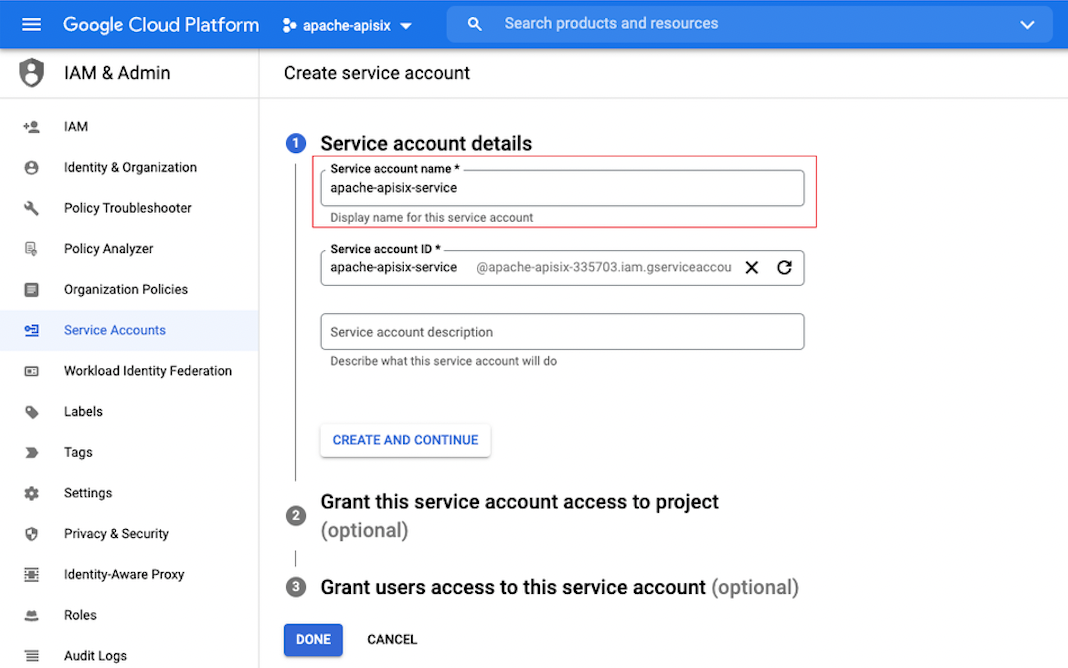
- Enter the service account name and ID (the ID usually follows the account generation), and then click "CREATE AND CONTINUE".
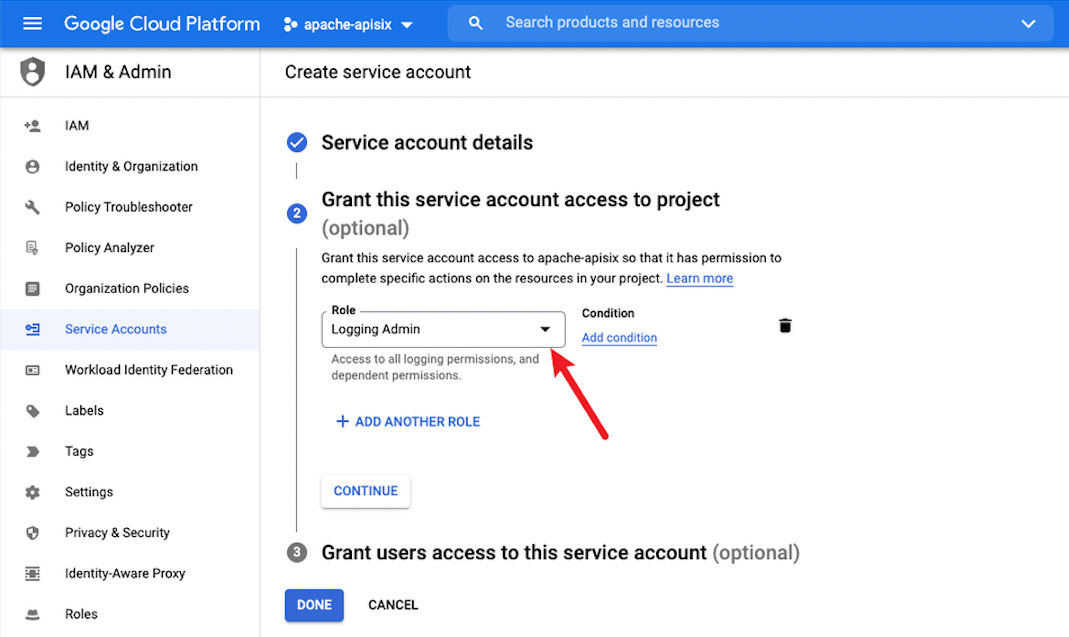
- Click on "Role" and type "Logging Admin" in the search box to search for this role and select "Logging Admin" as the role.
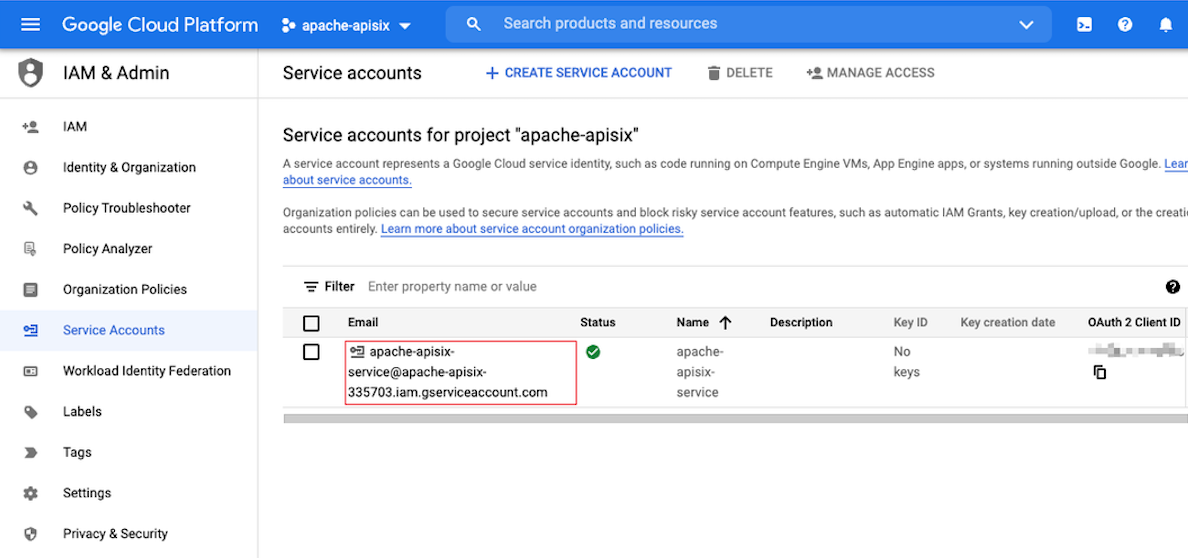
- Click "DONE" to complete the service account creation and jump to the service account home page. At this point you can see the account you just created and its details in the list.
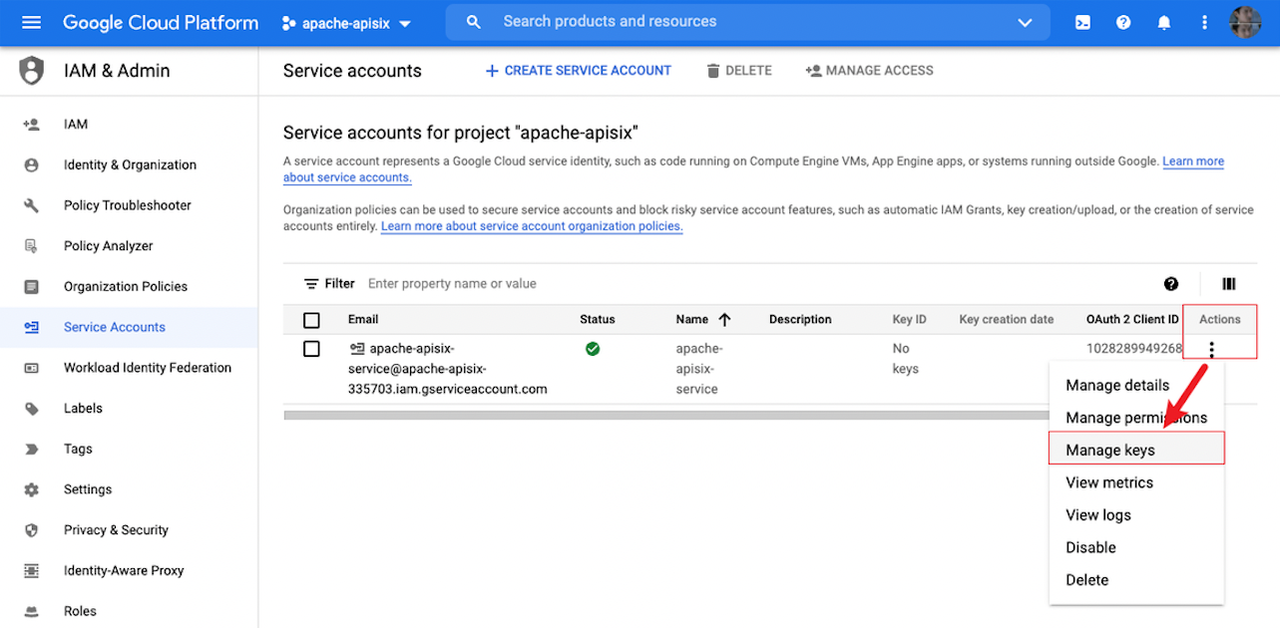
- Click "Manage keys" in the last column of the service account to enter the secret key management interface.
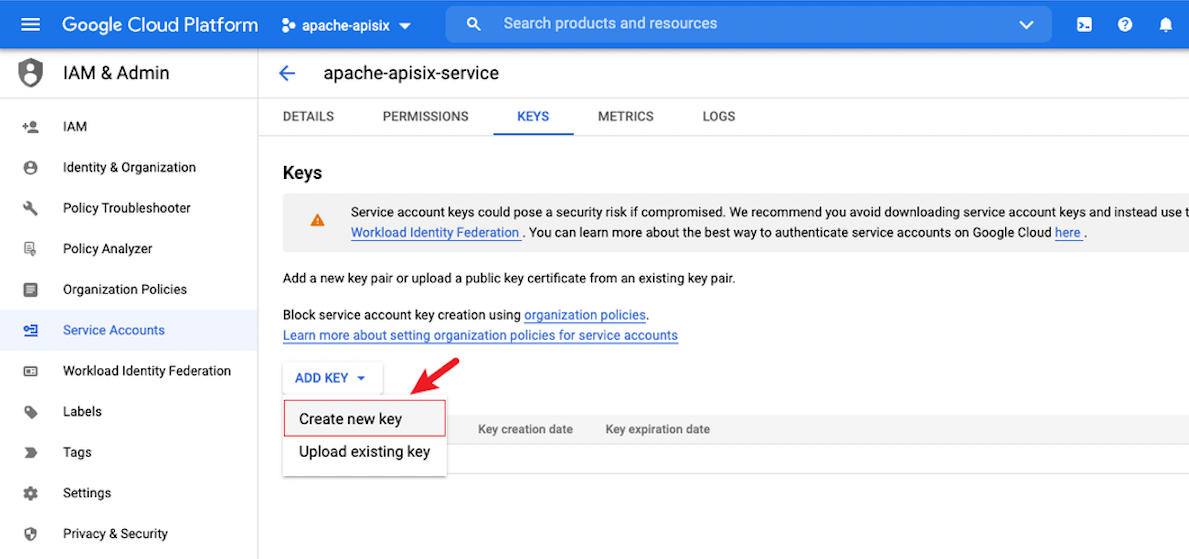
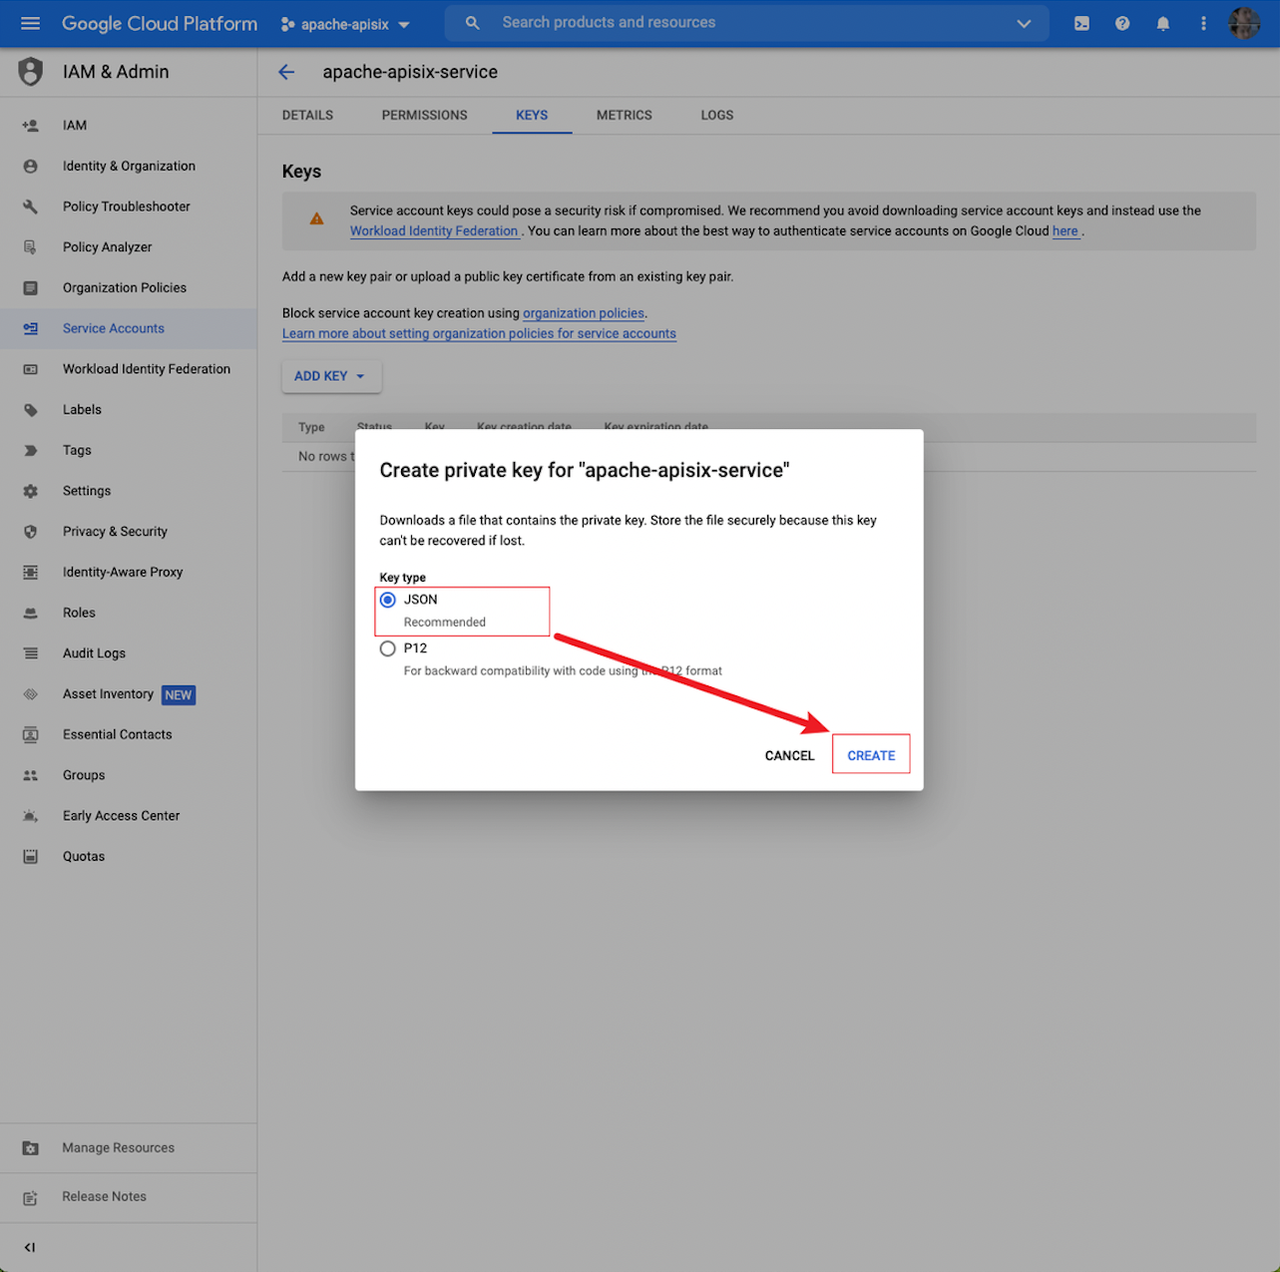
- Click "ADD KEY > Create new key" to start creating a new secret key.
- Select the secret key type as "JSON" in the pop-up page, and then click "CREATE" to create a new secret key.
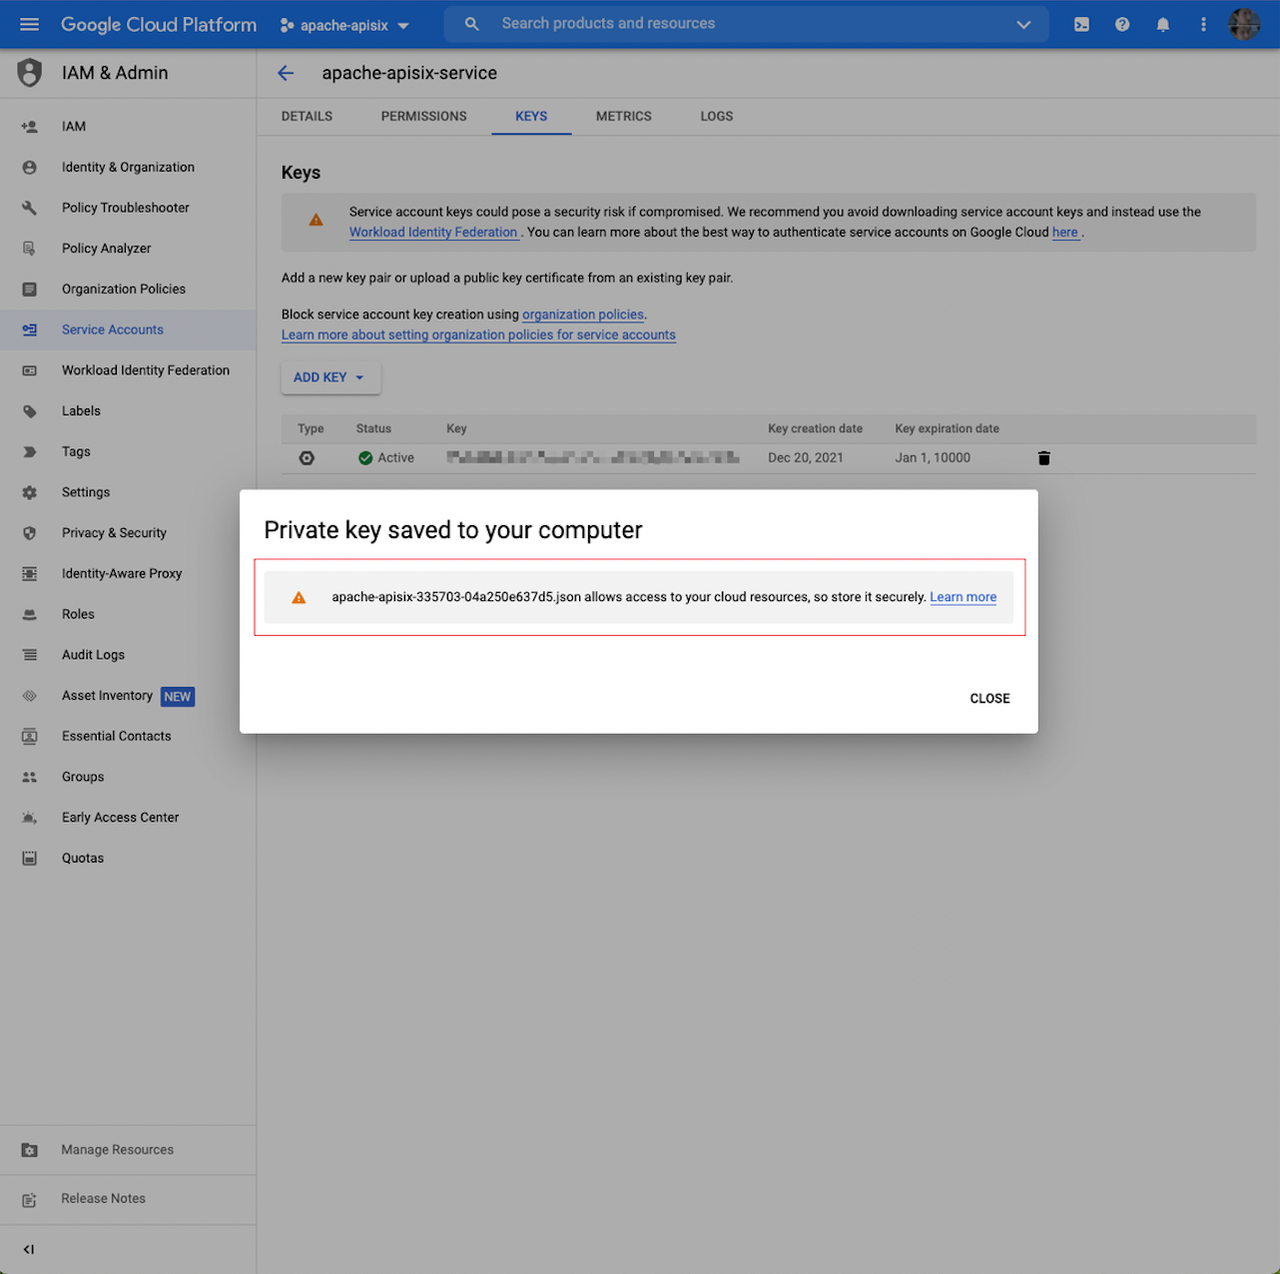
- The private key information will be automatically downloaded to the system default Downloads directory through your browser . When you enable google-cloud-logging plugin, you need to use the information in this private key, so please save the private key file.
Configure Apache APISIX#
Enable google-cloud-logging plugin#
Option 1: Upload key file configuration#
- Upload the private key file to the Apache APISIX node server.
- Configure the file path to the
google-cloud-logging.auth_file, as shown below:
curl http://127.0.0.1:9080/apisix/admin/routes/1 -H 'X-API-KEY: edd1c9f034335f136f87ad84b625c8f1' -X PUT -d '{ "uri":"/logging.do", "upstream":{ "type":"roundrobin", "nodes":{ "127.0.0.1:1980":1 } }, "plugins":{ "google-cloud-logging":{ // Google Cloud Logging Private Key File "auth_file":"/path/to/apache-apisix-fcafc68c2f41.json", // Maximum number of entries per batch queue. "batch_max_size": 1, // Maximum time to refresh the buffer in seconds. "inactive_timeout": 10 } }}'Option 2: Declare configurations in JSON#
- Open the private key file.
- Configure the value of
project_idtogoogle-cloud-logging.auth_config.project_id. - Configure the value of
private_keytogoogle-cloud-logging.auth_config.private_key. As shown below:
curl http://127.0.0.1:9080/apisix/admin/routes/1 -H 'X-API-KEY: edd1c9f034335f136f87ad84b625c8f1' -X PUT -d '{ "uri":"/logging.do", "upstream":{ "type":"roundrobin", "nodes":{ "127.0.0.1:1980":1 } }, "plugins":{ "google-cloud-logging":{ // Google Cloud Logging Private Key File "auth_config":{ "project_id":"apache-apisix", "private_key":"-----BEGIN RSA PRIVATE KEY-----your private key-----END RSA PRIVATE KEY-----" }, // Maximum number of entries per batch queue. "batch_max_size": 1, // Maximum time to refresh the buffer in seconds. "inactive_timeout": 10 } }}'Parameters#
| Name | Required | Defualt Value | Description |
|---|---|---|---|
| auth_config | No | n/a | Google Cloud Logging Private Key File. Either auth_config or auth_file must be configured. |
| auth_config.private_key | Yes | n/a | Google Cloud Logging Private Key. |
| auth_config.project_id | Yes | n/a | Project ID of Google Service Account. |
| auth_config.token_uri | No | oauth2.googleapis.com/token | The URI of the token requesting the Google Services account. |
| auth_config.entries_uri | No | logging.googleapis.com/v2/entries:write | Google Log Service Write Log Entry API. |
| auth_config.scopes | No | ["https://www.googleapis.com/auth/logging.read","https://www.googleapis.com/auth/logging.write","https://www.googleapis.com/auth/logging.admin","https://www.googleapis.com/auth/cloud-platform"] | Google Services account access scope, refer to: OAuth 2.0 Scopes for Google APIs |
| auth_file | No | n/a | Path to the Google Services account JSON file (either auth_config or auth_file must be configured) |
| ssl_verify | No | TRUE | Enable SSL authentication, configured according to OpenResty documentation options. |
| resource | No | {"type": "global"} | Google Monitored Resources, please refer to MonitoredResource. |
| log_id | No | apisix.apache.org%2Flogs | Google Log ID, reference: LogEntry. |
| max_retry_count | No | 0 | Maximum number of retries before removal from the processing pipeline. |
| retry_delay | No | 1 | Number of seconds that process execution should be delayed if execution fails. |
| buffer_duration | No | 60 | The maximum duration (in seconds) of the oldest entry in the batch must be processed first. |
| inactive_timeout | No | 10 | Maximum time to refresh the buffer in seconds. |
| batch_max_size | No | 100 | Maximum time to refresh the buffer in seconds. |
Verify plugin is running normally#
Run the following command to send a request to Google Cloud Logging.
curl -i http://127.0.0.1:9080/logging.do HTTP/1.1 200 OK Content-Type: text/html; charset=utf-8 Transfer-Encoding: chunked Connection: keep-alive Date: Fri, 10 Dec 2021 09:57:52 GMT Server: APISIX/2.11.0 Hello, Google Cloud LoggingOpen your browser and visit Google Cloud Homepage.
Enter your username and password to log in to the Google Cloud console.
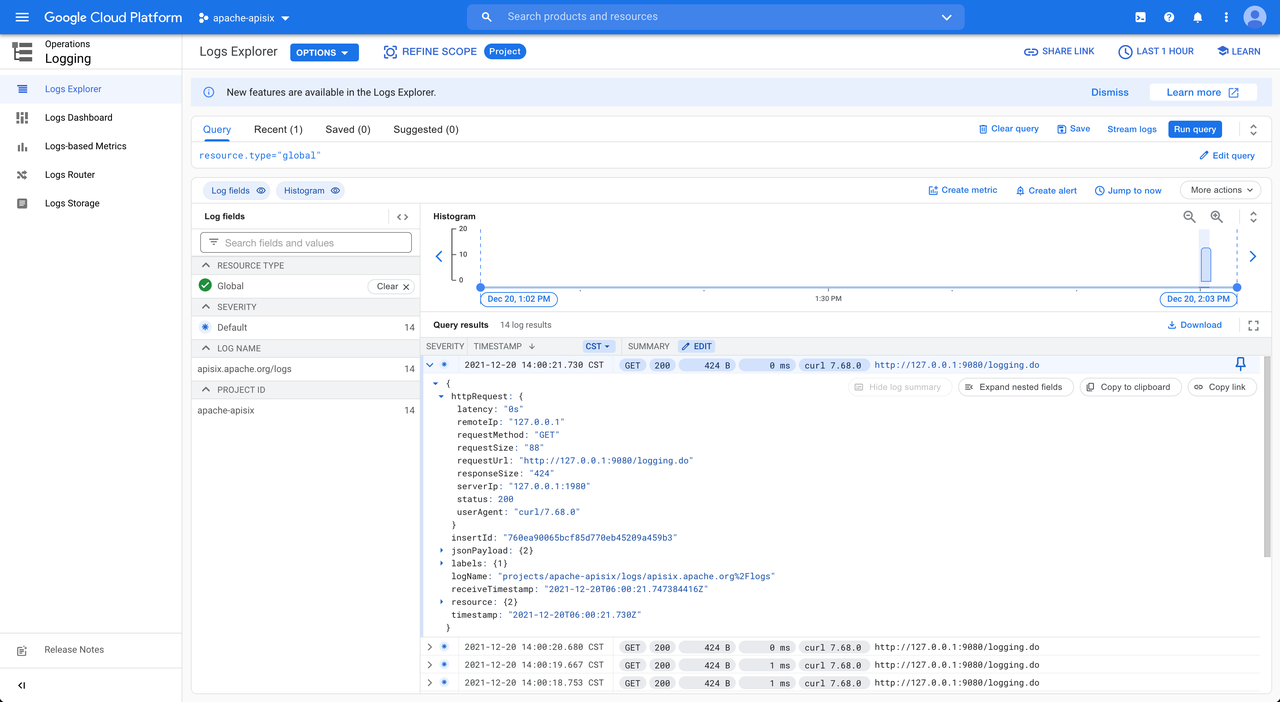
View the log of requests sent through the log browser, and the returned results are shown below.
Disable google-cloud-logging plugin#
You can remove the google-cloud-logging related configuration block to deactivate the plugin if you are finished using it.
curl http://127.0.0.1:9080/apisix/admin/routes/1 -H 'X-API-KEY: edd1c9f034335f136f87ad84b625c8f1' -X PUT -d '{ "uri":"/logging.do", "upstream":{ "type":"roundrobin", "nodes":{ "127.0.0.1:1980":1 } }, "plugins":{ }}'Summary#
This article describes the detailed steps for interfacing Apache APISIX and Google Cloud Logging. We hope this article will give you a clearer understanding of using Google Cloud Logging in Apache APISIX and facilitate the subsequent hands-on operation.
Apache APISIX is not only committed to maintaining its own high performance, but also has always attached great importance to the construction of open source ecology. At present, Apache APISIX has 10+ logging-related plugins and supports interfacing with mainstream open source logging projects in the industry.
If you have a need to interface to other logs, visit Apache APISIX's GitHub and leave your suggestions via issue; or subscribe to the Apache APISIX mailing list and express your thoughts via email.
Related articles#
Apache APISIX Integrates with SkyWalking to Create a Full Range of Log Processing
Apache APISIX & RocketMQ Helps User API Log Monitoring Capabilities