这篇文章将详细讲解如何用 Go 来开发 Apache APISIX 插件。通过拥抱 Go 的生态圈,为 Apache APISIX 开创一片新天地,希望 Go 能让 Apache APISIX 如虎添翼!
为什么是 Go#
Apache APISIX 允许用户通过插件的方式来拓展功能,如鉴权、限流、请求改写等核心功能都是通过插件的方式实现的。虽然 Apache APISIX 核心代码是使用 Lua 编写的,但是 Apache APISIX 支持多语言开发插件,比如 Go 、Java。
这篇文章将详细讲解如何用 Go 来开发 Apache APISIX 插件。通过拥抱 Go 的生态圈,为 Apache APISIX 开创一片新天地,希望 Go 能让 Apache APISIX 如虎添翼!
安装#
采用库的方式来使用 Go Runner,apisix-go-plugin-runner 中的 cmd/go-runner 官方给出的例子,展示该如何使用 Go Runner SDK。未来也会支持通过 Go Plugin 的机制加载预先编译好的插件。
开发#
使用 Go Runner SDK 进行开发#
$ tree cmd/go-runnercmd/go-runner├── main.go├── main_test.go├── plugins│ ├── say.go│ └── say_test.go└── version.go上面是官方示例的目录结构。main.go 是入口,其中最关键的部分在于:
cfg := runner.RunnerConfig{}...runner.Run(cfg)RunnerConfig 可以用来控制日志等级和日志输出位置。
runner.Run 会让应用监听目标位置,接收请求并执行注册好的插件。应用会一直处于这一状态直到退出。
打开 plugins/say.go:
func init() { err := plugin.RegisterPlugin(&Say{}) if err != nil { log.Fatalf("failed to register plugin say: %s", err) }}由于 main.go 导入了 plugins 包,
import ( ... _ "github.com/apache/apisix-go-plugin-runner/cmd/go-runner/plugins" ...)这样就在执行 runner.Run 之前通过 plugin.RegisterPlugin 注册了 Say。
Say 需要实现以下方法:
Name 方法返回插件名。
func (p *Say) Name() string { return "say"}ParseConf 会在插件配置变化的时候调用,解析配置并返回插件特定的配置上下文。
func (p *Say) ParseConf(in []byte) (interface{}, error) { conf := SayConf{} err := json.Unmarshal(in, &conf) return conf, err}该插件的上下文是这样的:
type SayConf struct { Body string `json:"body"`}Filter 会在每个配置了 say 插件的请求中执行。
func (p *Say) Filter(conf interface{}, w http.ResponseWriter, r pkgHTTP.Request) {  body := conf.(SayConf).Body  if len(body) == 0 {    return  }
w.Header().Add("X-Resp-A6-Runner", "Go") _, err := w.Write([]byte(body)) if err != nil { log.Errorf("failed to write: %s", err) }}可以看到 Filter 把配置里面的 body 的值作为响应体。如果在插件中直接进行响应,就会中断请求。
Go Runner SDK API 文档:https://pkg.go.dev/github.com/apache/apisix-go-plugin-runner
把应用构建起来后(在示例里面是 make build),在运行时需要设置两个环境变量:
APISIX_LISTEN_ADDRESS=unix:/tmp/runner.sockAPISIX_CONF_EXPIRE_TIME=3600
像这样:
APISIX_LISTEN_ADDRESS=unix:/tmp/runner.sock APISIX_CONF_EXPIRE_TIME=3600 ./go-runner run应用运行时会去监听 /tmp/runner.sock。
设置 Apache APISIX(开发)#
首先要安装 Apache APISIX,需要和 Go Runner 位于同一实例上。

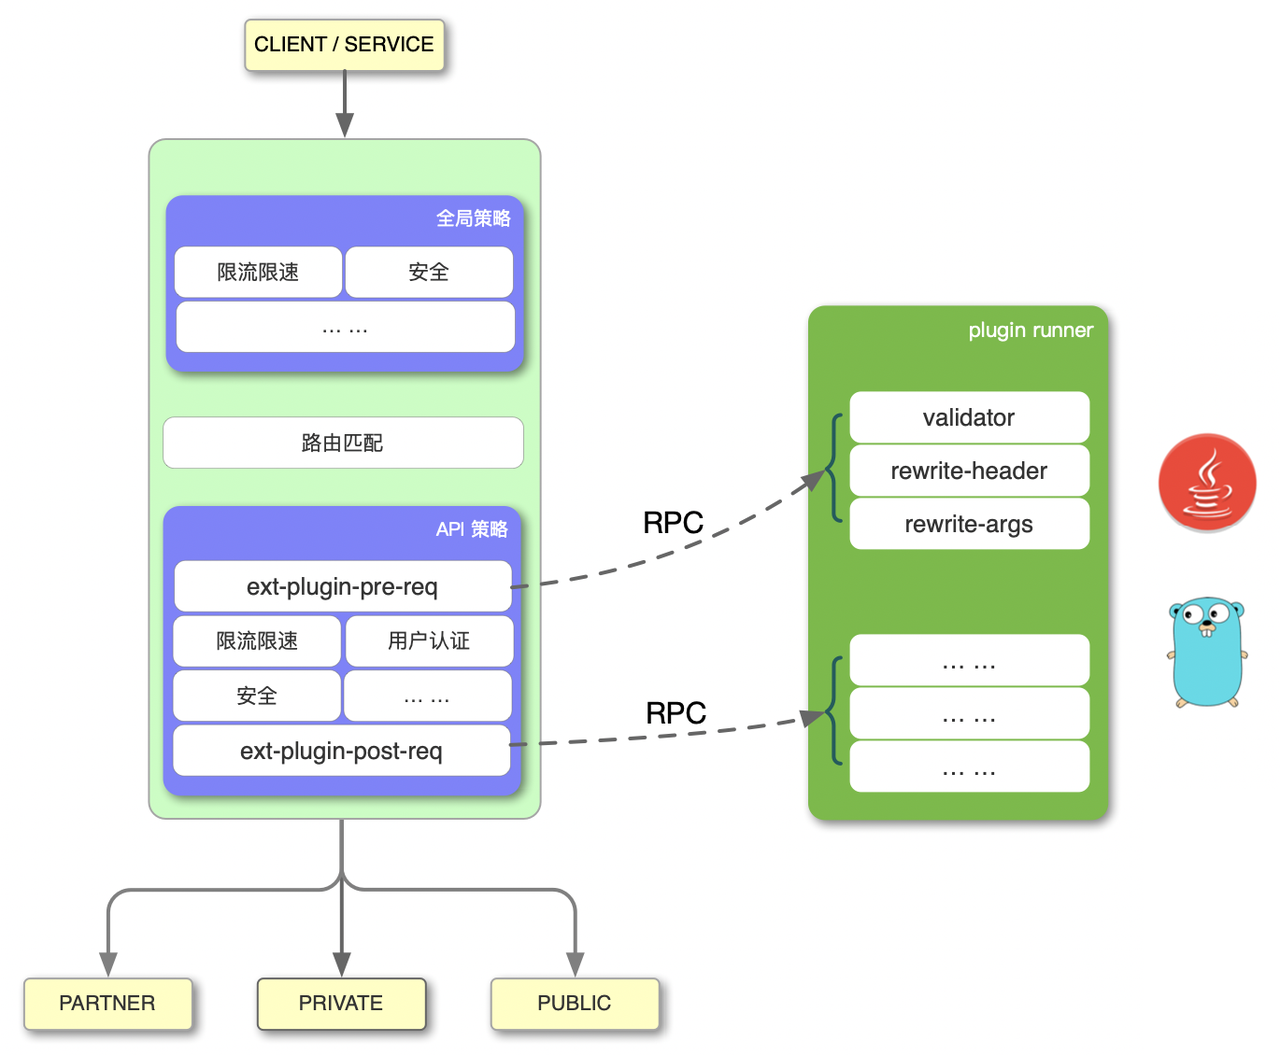
上图左边是 Apache APISIX 的工作流程,右边的 plugin runner 负责运行不同语言编写的外部插件。apisix-go-plugin-runner 就是这样支持 Go 语言的 runner。
当你在 Apache APISIX 中配置一个 plugin runner 时,Apache APISIX 会把 plugin runner 作为自己的一个子进程,该子进程与 Apache APISIX 进程属于同一个用户,当我们重启或重新加载 Apache APISIX 时,plugin runner 也将被重启。
如果为一个给定的路由配置了 ext-plugin-* 插件,击中该路由的请求将触发 Apache APISIX 通过 unix socket 向 plugin runner 执行 RPC 调用。调用细分为两个阶段:
- ext-plugin-pre-req: 在执行绝大部分 Apache APISIX 内置插件(Lua 语言插件)之前
- ext-plugin-post-req: 在执行 Apache APISIX 内置插件(Lua 语言插件)之后
根据需要配置 plugin runner 的执行时机。
plugin runner 会处理 RPC 调用,在其内部创建一个模拟请求,然后运行其他语言编写的插件,并将结果返回给 Apache APISIX。
这些插件的执行顺序是在 ext-plugin-* 插件配置项中定义的。像其他插件一样,它们可以被启用并在运行中重新定义。
为了展示如何开发 Go 插件,我们先设置 Apache APISIX 进入开发模式。在 config.yaml 中增加以下配置:
ext-plugin: path_for_test: /tmp/runner.sock这个配置的意思是,命中路由规则后,Apache APISIX 会向 /tmp/runner.sock 发起 RPC 请求。
接下来设置路由规则:
curl http://127.0.0.1:9080/apisix/admin/routes/1 -H 'X-API-KEY: edd1c9f034335f136f87ad84b625c8f1' -X PUT -d '{ "uri": "/get", "plugins": { "ext-plugin-pre-req": { "conf": [ {"name":"say", "value":"{\"body\":\"hello\"}"} ] } }, "upstream": { "type": "roundrobin", "nodes": { "127.0.0.1:1980": 1 } }}'注意插件名称配置在 name 里面,插件配置(经 JSON 序列化后)放在 value 里面。
如果在开发过程中看到 Apache APISIX 端有 refresh cache and try again 的 warning 和 Runner 端有 key not found 的 warning,这是因为配置缓存不一致导致的。因为开发状态下,Runner 不是由 Apache APISIX 管理的,所以内部状态会有可能不一致。不用担心,Apache APISIX 会重试。
然后我们请求一下:curl 127.0.0.1:9080/get
$ curl http://127.0.0.1:9080/getHTTP/1.1 200 OKDate: Mon, 26 Jul 2021 11:16:11 GMTContent-Type: text/plain; charset=utf-8Transfer-Encoding: chunkedConnection: keep-aliveX-Resp-A6-Runner: GoServer: APISIX/2.7
hello可以看到接口返回 hello 而且没有访问到任何上游。
设置 Apache APISIX(运行)#
这里以 go-runner 为例,只需把运行命令行配置在 ext-plugin 里就可以运行了:
ext-plugin: # path_for_test: /tmp/runner.sock cmd: ["/path/to/apisix-go-plugin-runner/go-runner", "run"]Apache APISIX 会把 plugin runner 作为自己的一个子进程,管理它的整个生命周期。
注意:这时就不要配置 path_for_test 了。Apache APISIX 在启动 runner 时会自动分配一个 unix socket 地址供 runner 监听。APISIX_LISTEN_ADDRESS 和 APISIX_CONF_EXPIRE_TIME 这两个环境变量也不用手动设置。
总结#
目前 Go Plugin Runner 还处于早期开发阶段,我们会陆续完善其功能。成功的开源项目离不开大家的贡献,欢迎各位参与到 apisix-go-plugin-runner 的开发中来,让我们一起共建 Apache APISIX 和 Go 的桥梁! 点击访问 apisix-go-plugin-runner.