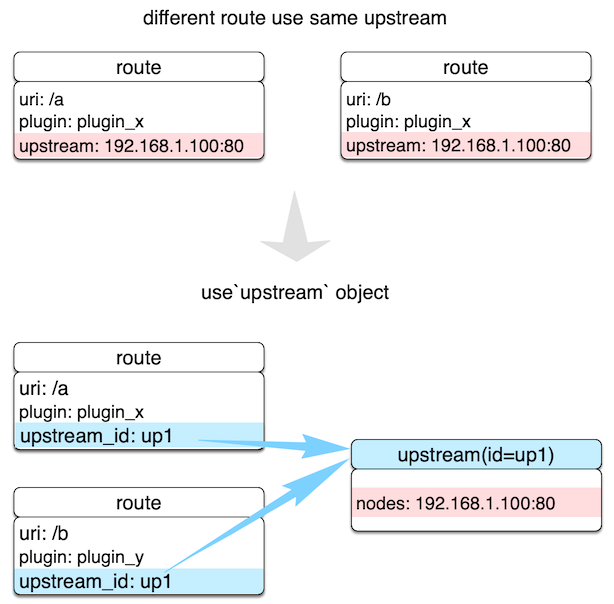
Upstream
Upstream 是虚拟主机抽象,对给定的多个服务节点按照配置规则进行负载均衡。Upstream 的地址信息可以直接配置到 Route(或 Service) 上,当 Upstream 有重复时,就需要用“引用”方式避免重复了。

如上图所示,通过创建 Upstream 对象,在 Route 用 ID 方式引用,就可以确保只维护一个对象的值了。
Upstream 的配置可以被直接绑定在指定 Route 中,也可以被绑定在 Service 中,不过 Route 中的配置
优先级更高。这里的优先级行为与 Plugin 非常相似
配置参数#
APISIX 的 Upstream 除了基本的负载均衡算法选择外,还支持对上游做主被动健康检查、重试等逻辑,具体看这个链接。
创建上游对象用例:
curl http://127.0.0.1:9080/apisix/admin/upstreams/1 -H 'X-API-KEY: edd1c9f034335f136f87ad84b625c8f1' -X PUT -d '{ "type": "chash", "key": "remote_addr", "nodes": { "127.0.0.1:80": 1, "foo.com:80": 2 }}'上游对象创建后,均可以被具体 Route 或 Service 引用,例如:
curl http://127.0.0.1:9080/apisix/admin/routes/1 -H 'X-API-KEY: edd1c9f034335f136f87ad84b625c8f1' -X PUT -d '{ "uri": "/index.html", "upstream_id": 2}'为了方便使用,也可以直接把上游地址直接绑到某个 Route 或 Service ,例如:
curl http://127.0.0.1:9080/apisix/admin/routes/1 -H 'X-API-KEY: edd1c9f034335f136f87ad84b625c8f1' -X PUT -d '{ "uri": "/index.html", "plugins": { "limit-count": { "count": 2, "time_window": 60, "rejected_code": 503, "key": "remote_addr" } }, "upstream": { "type": "roundrobin", "nodes": { "39.97.63.215:80": 1 } }}'下面是一个配置了健康检查的示例:
curl http://127.0.0.1:9080/apisix/admin/routes/1 -H 'X-API-KEY: edd1c9f034335f136f87ad84b625c8f1' -X PUT -d '{ "uri": "/index.html", "plugins": { "limit-count": { "count": 2, "time_window": 60, "rejected_code": 503, "key": "remote_addr" } }, "upstream": { "nodes": { "39.97.63.215:80": 1 } "type": "roundrobin", "retries": 2, "checks": { "active": { "http_path": "/status", "host": "foo.com", "healthy": { "interval": 2, "successes": 1 }, "unhealthy": { "interval": 1, "http_failures": 2 } } } }}'更多细节可以参考健康检查的文档。
下面是几个使用不同hash_on类型的配置示例:
Consumer#
创建一个 consumer 对象:
curl http://127.0.0.1:9080/apisix/admin/consumers -H 'X-API-KEY: edd1c9f034335f136f87ad84b625c8f1' -X PUT -d '{ "username": "jack", "plugins": { "key-auth": { "key": "auth-jack" } }}'新建路由,打开key-auth插件认证,upstream的hash_on类型为consumer:
curl http://127.0.0.1:9080/apisix/admin/routes/1 -H 'X-API-KEY: edd1c9f034335f136f87ad84b625c8f1' -X PUT -d '{ "plugins": { "key-auth": {} }, "upstream": { "nodes": { "127.0.0.1:1980": 1, "127.0.0.1:1981": 1 }, "type": "chash", "hash_on": "consumer" }, "uri": "/server_port"}'测试请求,认证通过后的consumer_name将作为负载均衡哈希算法的哈希值:
curl http://127.0.0.1:9080/server_port -H "apikey: auth-jack"Cookie#
新建路由和Upstream,hash_on类型为cookie:
curl http://127.0.0.1:9080/apisix/admin/routes/1 -H 'X-API-KEY: edd1c9f034335f136f87ad84b625c8f1' -X PUT -d '{ "uri": "/hash_on_cookie", "upstream": { "key": "sid", "type ": "chash", "hash_on ": "cookie", "nodes ": { "127.0.0.1:1980": 1, "127.0.0.1:1981": 1 } }}'客户端请求携带Cookie:
curl http://127.0.0.1:9080/hash_on_cookie -H 'X-API-KEY: edd1c9f034335f136f87ad84b625c8f1' -H "Cookie: sid=3c183a30cffcda1408daf1c61d47b274"Header#
新建路由和Upstream,hash_on类型为header, key为content-type:
curl http://127.0.0.1:9080/apisix/admin/routes/1 -H 'X-API-KEY: edd1c9f034335f136f87ad84b625c8f1' -X PUT -d '{ "uri": "/hash_on_header", "upstream": { "key": "content-type", "type ": "chash", "hash_on ": "header", "nodes ": { "127.0.0.1:1980": 1, "127.0.0.1:1981": 1 } }}'客户端请求携带content-type的header:
curl http://127.0.0.1:9080/hash_on_header -H 'X-API-KEY: edd1c9f034335f136f87ad84b625c8f1' -H "Content-Type: application/json"