Architecture Design
Table of Contents#
- Table of Contents
- APISIX
- APISIX Config
- Route
- Service
- Plugin
- Script
- Upstream
- Router
- Consumer
- Global Rule
- Plugin Config
- Debug mode
APISIX#
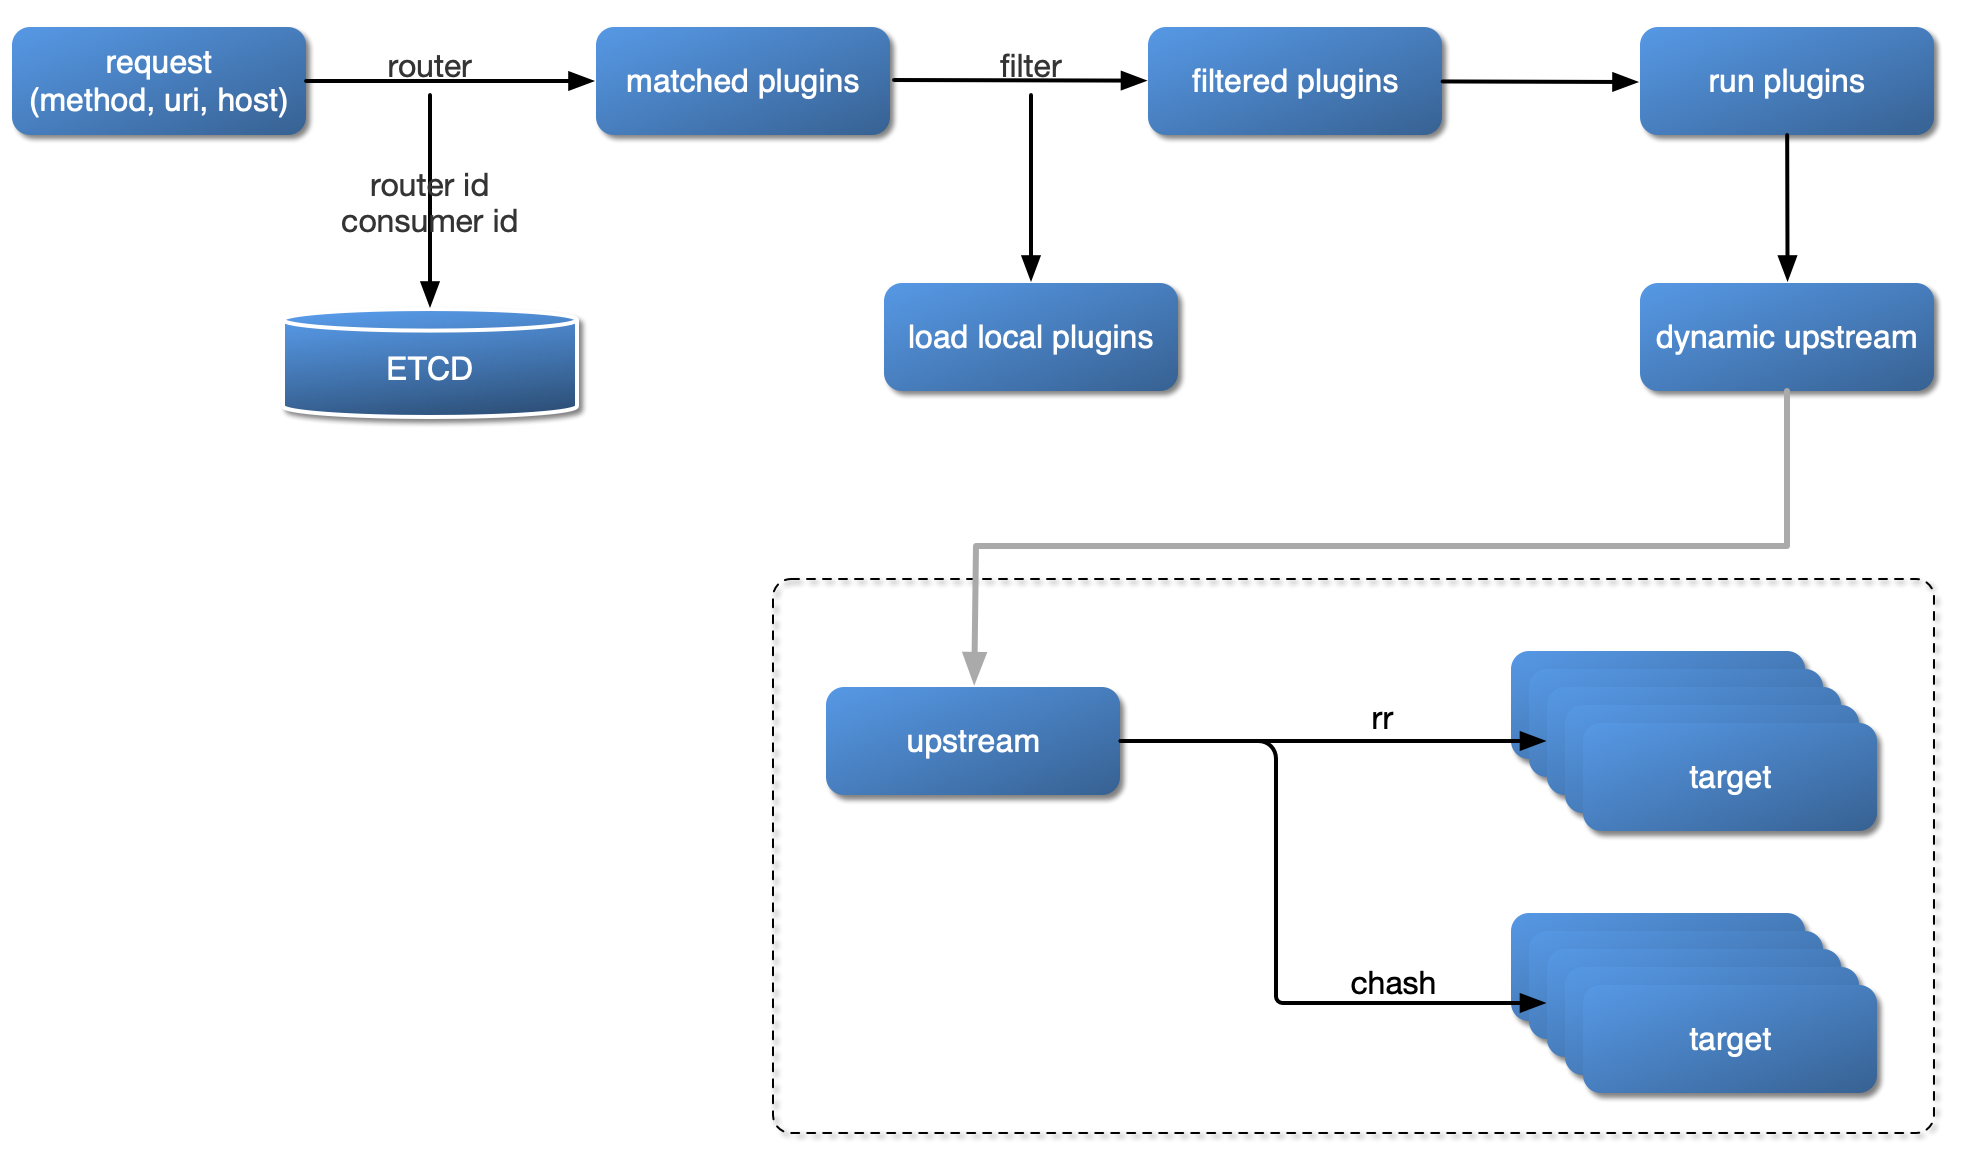
Plugin Loading Process#
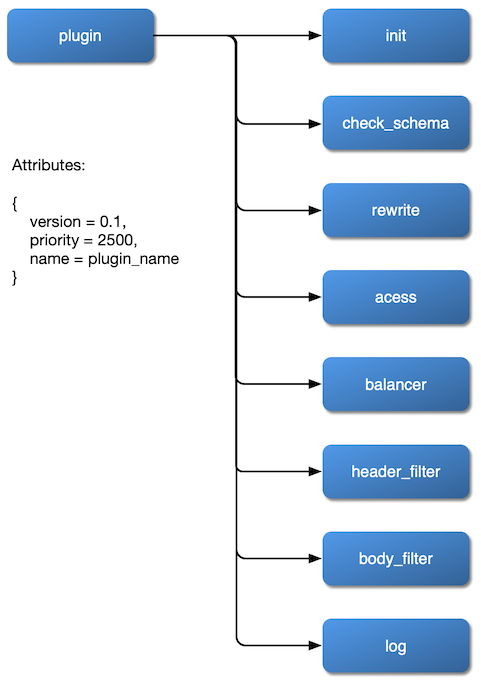
Plugin Hierarchy Structure#
APISIX Config#
There are two methods to configure APISIX: directly change conf/config.yaml, or add file path argument using -c or --config flag when start APISIX like apisix start -c <path string>
For example, set the default listening port of APISIX to 8000, and keep other configurations as default. The configuration in config.yaml should be like this:
apisix: node_listen: 8000 # APISIX listening portSet the default listening port of APISIX to 8000, set the etcd address to http://foo:2379,
and keep other configurations as default. The configuration in config.yaml should be like this:
apisix:  node_listen: 8000 # APISIX listening port
etcd: host: "http://foo:2379" # etcd addressOther default configurations can be found in the conf/config-default.yaml file, which is bound to the APISIX source code. Never manually modify the conf/config-default.yaml file. If you need to customize any configuration, you should update the config.yaml file.
Note APISIX will generate conf/nginx.conf file automatically, so please DO NOT EDIT conf/nginx.conf file too.
Route#
The route matches the client's request by defining rules, then loads and executes the corresponding plugin based on the matching result, and forwards the request to the specified Upstream.
The route mainly consists of three parts: matching rules (e.g uri, host, remote_addr, etc.), plugin configuration (current-limit & rate-limit, etc.) and upstream information.
The following image shows an example of some Route rules. When some attribute values are the same, the figure is identified by the same color.

We configure all the parameters directly in the Route, it's easy to set up, and each Route has a relatively high degree of freedom. But when our Route has more repetitive configurations (such as enabling the same plugin configuration or upstream information), once we need update these same properties, we have to traverse all the Routes and modify them, so it's adding a lot of complexity of management and maintenance.
The shortcomings mentioned above are independently abstracted in APISIX by the two concepts Service and Upstream.
The route example created below is to proxy the request with URL /index.html to the Upstream service with the address 39.97.63.215:80:
$ curl http://127.0.0.1:9080/apisix/admin/routes/1 -H 'X-API-KEY: edd1c9f034335f136f87ad84b625c8f1' -X PUT -i -d '{    "uri": "/index.html",    "upstream": {        "type": "roundrobin",        "nodes": {            "39.97.63.215:80": 1        }    }}'
HTTP/1.1 201 CreatedDate: Sat, 31 Aug 2019 01:17:15 GMTContent-Type: text/plainTransfer-Encoding: chunkedConnection: keep-aliveServer: APISIX web server
{"node":{"value":{"uri":"\/index.html","upstream":{"nodes":{"39.97.63.215:80":1},"type":"roundrobin"}},"createdIndex":61925,"key":"\/apisix\/routes\/1","modifiedIndex":61925},"action":"create"}When we receive a successful response, it indicates that the route was successfully created.
For specific options of Route, please refer to Admin API.
Service#
A Service is an abstraction of an API (which can also be understood as a set of Route abstractions). It usually corresponds to the upstream service abstraction. Between Route and Service, usually the relationship of N:1, please see the following image.

Different Route rules are bound to a Service at the same time. These Routes will have the same upstream and plugin configuration, reducing redundant configuration.
The following example creates a Service that enables the current-limit plugin, and then binds the Route with the id of 100 and 101 to the Service.
# create new Service$ curl http://127.0.0.1:9080/apisix/admin/services/200 -H 'X-API-KEY: edd1c9f034335f136f87ad84b625c8f1' -X PUT -d '{    "plugins": {        "limit-count": {            "count": 2,            "time_window": 60,            "rejected_code": 503,            "key": "remote_addr"        }    },    "upstream": {        "type": "roundrobin",        "nodes": {            "39.97.63.215:80": 1        }    }}'
# create new Route and reference the service by id `200`curl http://127.0.0.1:9080/apisix/admin/routes/100 -H 'X-API-KEY: edd1c9f034335f136f87ad84b625c8f1' -X PUT -d '{    "methods": ["GET"],    "uri": "/index.html",    "service_id": "200"}'
curl http://127.0.0.1:9080/apisix/admin/routes/101 -H 'X-API-KEY: edd1c9f034335f136f87ad84b625c8f1' -X PUT -d '{ "methods": ["GET"], "uri": "/foo/index.html", "service_id": "200"}'Of course, we can also specify different plugin parameters or upstream for Route. Some of the following Routes have different current-limit parameters. Other parts (such as upstream) continue to use the configuration parameters in Service.
curl http://127.0.0.1:9080/apisix/admin/routes/102 -H 'X-API-KEY: edd1c9f034335f136f87ad84b625c8f1' -X PUT -d '{ "uri": "/bar/index.html", "id": "102", "service_id": "200", "plugins": { "limit-count": { "count": 2000, "time_window": 60, "rejected_code": 503, "key": "remote_addr" } }}'Note: When both Route and Service enable the same plugin, the Route parameter has a higher priority than Service.
Plugin#
Plugin represents the plugin configuration that will be executed during the HTTP request/response lifecycle.
The Plugin configuration can be bound directly to Route or it can be bound to Service or Consumer. For the configuration of the same plugin, only one copy is valid, and the configuration selection priority is always Consumer > Route > Service.
In conf/config.yaml, you can declare which plugins are supported by the local APISIX node. This is a whitelisting mechanism. Plugins that are not in this whitelist will be automatically ignored. This feature can be used to temporarily turn off or turn on specific plugins, which is very effective in dealing with unexpected situations. If you want to add new plugins based on existing plugins, you need to copy the data of plugins node which in conf/config-default.yaml to the plugins node of conf/config.yaml.
The configuration of the plugin can be directly bound to the specified Route, or it can be bound to the Service, but the plugin configuration in Route has a higher priority.
A plugin will only be executed once in a single request, even if it is bound to multiple different objects (such as Route or Service).
The order in which plugins are run is determined by the priority of the plugin itself, for example:
local _M = { version = 0.1, priority = 0, -- the priority of this plugin will be 0 name = plugin_name, schema = schema, metadata_schema = metadata_schema,}The plugin configuration is submitted as part of Route or Service and placed under plugins. It internally uses the plugin name as the hash's key to hold configuration items for different plugins.
{ ... "plugins": { "limit-count": { "count": 2, "time_window": 60, "rejected_code": 503, "key": "remote_addr" }, "prometheus": {} }}Not all plugins have specific configuration items. For example, there is no specific configuration item under prometheus. In this case, an empty object identifier can be used.
If a request is rejected by a plugin, there will be warn level log like ip-restriction exits with http status code 403.
Script#
Script represents a script that will be executed during the HTTP request/response life cycle.
The Script configuration can be directly bound to the Route.
Script and Plugin are mutually exclusive, and Script is executed first. This means that after configuring Script, the Plugin configured on Route will not be executed.
In theory, you can write arbitrary Lua code in Script, or you can directly call existing plugins to reuse existing code.
Script also has the concept of execution phase, supporting access, header_filter, body_filter and log phase. The system will automatically execute the code of the corresponding phase in the Script script in the corresponding phase.
{ ... "script": "local _M = {} \n function _M.access(api_ctx) \n ngx.log(ngx.INFO,\"hit access phase\") \n end \nreturn _M"}Upstream#
Upstream is a virtual host abstraction that performs load balancing on a given set of service nodes according to configuration rules. Upstream address information can be directly configured to Route (or Service). When Upstream has duplicates, you need to use "reference" to avoid duplication.
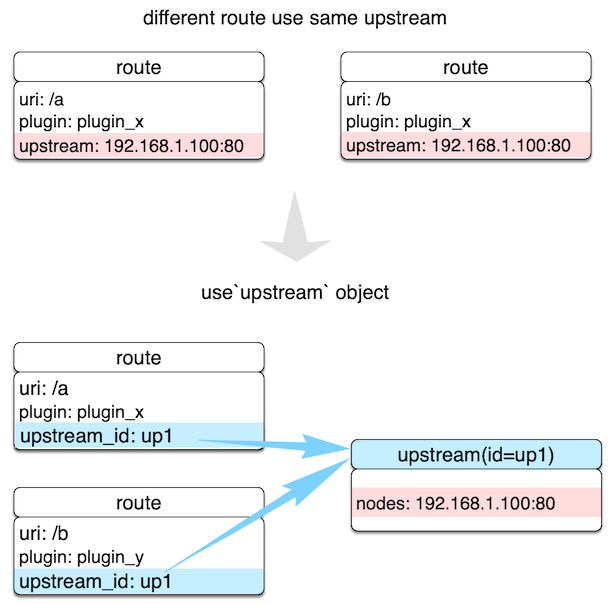
As shown in the image above, by creating an Upstream object and referencing it by ID in Route, you can ensure that only the value of an object is maintained.
Upstream configuration can be directly bound to the specified Route or it can be bound to Service, but the configuration in Route has a higher priority. The priority behavior here is very similar to Plugin.
Configuration#
In addition to the basic complex equalization algorithm selection, APISIX's Upstream also supports logic for upstream passive health check and retry, see the link below.
https://github.com/apache/apisix/blob/master/docs/en/latest/admin-api.md#upstream
Create an upstream object use case:
curl http://127.0.0.1:9080/apisix/admin/upstreams/1 -H 'X-API-KEY: edd1c9f034335f136f87ad84b625c8f1' -X PUT -d '{ "type": "chash", "key": "remote_addr", "nodes": { "127.0.0.1:80": 1, "foo.com:80": 2 }}'After the upstream object is created, it can be referenced by specific Route or Service, for example:
curl http://127.0.0.1:9080/apisix/admin/routes/1 -H 'X-API-KEY: edd1c9f034335f136f87ad84b625c8f1' -X PUT -d '{ "uri": "/index.html", "upstream_id": 1}'For convenience, you can also directly bind the upstream address to a Route or Service, for example:
curl http://127.0.0.1:9080/apisix/admin/routes/1 -H 'X-API-KEY: edd1c9f034335f136f87ad84b625c8f1' -X PUT -d '{ "uri": "/index.html", "plugins": { "limit-count": { "count": 2, "time_window": 60, "rejected_code": 503, "key": "remote_addr" } }, "upstream": { "type": "roundrobin", "nodes": { "39.97.63.215:80": 1 } }}'Here's an example of configuring a health check:
curl http://127.0.0.1:9080/apisix/admin/routes/1 -H 'X-API-KEY: edd1c9f034335f136f87ad84b625c8f1' -X PUT -d '{ "uri": "/index.html", "plugins": { "limit-count": { "count": 2, "time_window": 60, "rejected_code": 503, "key": "remote_addr" } }, "upstream": { "nodes": { "39.97.63.215:80": 1 } "type": "roundrobin", "retries": 2, "checks": { "active": { "http_path": "/status", "host": "foo.com", "healthy": { "interval": 2, "successes": 1 }, "unhealthy": { "interval": 1, "http_failures": 2 } } } }}'More details can be found in Health Checking Documents.
Here are some examples of configurations using different hash_on types:
Consumer#
Create a consumer object:
curl http://127.0.0.1:9080/apisix/admin/consumers -H 'X-API-KEY: edd1c9f034335f136f87ad84b625c8f1' -X PUT -d '{ "username": "jack", "plugins": { "key-auth": { "key": "auth-jack" } }}'Create route object and enable key-auth plugin authentication:
curl http://127.0.0.1:9080/apisix/admin/routes/1 -H 'X-API-KEY: edd1c9f034335f136f87ad84b625c8f1' -X PUT -d '{ "plugins": { "key-auth": {} }, "upstream": { "nodes": { "127.0.0.1:1980": 1, "127.0.0.1:1981": 1 }, "type": "chash", "hash_on": "consumer" }, "uri": "/server_port"}'Test request, the consumer_name after authentication is passed will be used as the hash value of the load balancing hash algorithm:
curl http://127.0.0.1:9080/server_port -H "apikey: auth-jack"Cookie#
Create route and upstream object, hash_on is cookie:
curl http://127.0.0.1:9080/apisix/admin/routes/1 -H 'X-API-KEY: edd1c9f034335f136f87ad84b625c8f1' -X PUT -d '{ "uri": "/hash_on_cookie", "upstream": { "key": "sid", "type ": "chash", "hash_on ": "cookie", "nodes ": { "127.0.0.1:1980": 1, "127.0.0.1:1981": 1 } }}'The client requests with Cookie:
curl http://127.0.0.1:9080/hash_on_cookie -H "Cookie: sid=3c183a30cffcda1408daf1c61d47b274"Header#
Create route and upstream object, hash_on is header, key is Content-Type:
curl http://127.0.0.1:9080/apisix/admin/routes/1 -H 'X-API-KEY: edd1c9f034335f136f87ad84b625c8f1' -X PUT -d '{ "uri": "/hash_on_header", "upstream": { "key": "content-type", "type ": "chash", "hash_on ": "header", "nodes ": { "127.0.0.1:1980": 1, "127.0.0.1:1981": 1 } }}'The client requests with header Content-Type:
curl http://127.0.0.1:9080/hash_on_header -H 'X-API-KEY: edd1c9f034335f136f87ad84b625c8f1' -H "Content-Type: application/json"Router#
A distinguishing feature of APISIX from other API gateways is that it allows users to choose different routers to better match free services, making the best choice between performance and freedom.
Set the route that best suits your business needs in the local configuration conf/config.yaml.
apisix.router.http: HTTP Request Route。radixtree_uri: (Default) only useurias the primary index. Support for full and deep prefix matching based on theradixtreeengine, see How to use router-radixtree.Absolute match: Complete match for the givenuri, such as/foo/bar,/foo/glo.Prefix match: Use*at the end to represent the givenurias a prefix match. For example,/foo*allows matching/foo/,/foo/aand/foo/b.match priority: first try absolute match, if you can't hit absolute match, try prefix match.Any filter attribute: Allows you to specify any Nginx built-in variable as a filter, such as URL request parameters, request headers, cookies, and so on.
radixtree_uri_with_parameter: Likeradixtree_uribut also support parameter match.radixtree_host_uri: Usehost + urias the primary index (based on theradixtreeengine), matching both host and URL for the current request.
apisix.router.ssl: SSL loads the matching route.radixtree_sni: (Default) UseSNI(Server Name Indication) as the primary index (based on the radixtree engine).
Consumer#
For the API gateway, it is usually possible to identify a certain type of requester by using a domain name such as a request domain name, a client IP address, etc., and then perform plugin filtering and forward the request to the specified upstream, but sometimes the depth is insufficient.
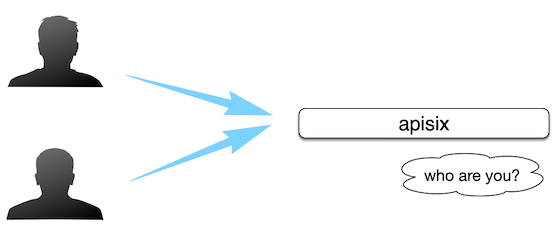
As shown in the image above, as an API gateway, you should know who the API Consumer is, so you can configure different rules for different API Consumers.
| Field | Required | Description |
|---|---|---|
| username | Yes | Consumer Name. |
| plugins | No | The corresponding plugin configuration of the Consumer, which has the highest priority: Consumer > Route > Service. For specific plugin configurations, refer to the Plugins section. |
In APISIX, the process of identifying a Consumer is as follows:
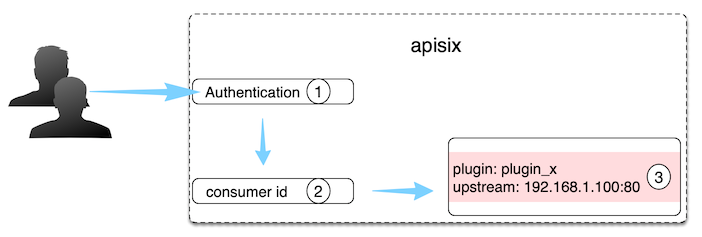
- Authorization certification: e.g key-auth, JWT, etc.
- Get consumer_name: By authorization, you can naturally get the corresponding Consumer
id, which is the unique identifier of the Consumer object. - Get the Plugin or Upstream information bound to the Consumer: Complete the different configurations for different Consumers.
To sum up, Consumer is a consumer of certain types of services and needs to be used in conjunction with the user authentication system.
For example, different consumers request the same API, and the gateway service corresponds to different Plugin or Upstream configurations according to the current request user information.
In addition, you can refer to the key-auth authentication authorization plugin call logic to help you further understand the Consumer concept and usage.
How to enable a specific plugin for a Consumer, you can see the following example:
# Create a Consumer, specify the authentication plugin key-auth, and enable the specific plugin limit-count$ curl http://127.0.0.1:9080/apisix/admin/consumers -H 'X-API-KEY: edd1c9f034335f136f87ad84b625c8f1' -X PUT -d '{    "username": "jack",    "plugins": {        "key-auth": {            "key": "auth-one"        },        "limit-count": {            "count": 2,            "time_window": 60,            "rejected_code": 503,            "key": "remote_addr"        }    }}'
# Create a Router, set routing rules and enable plugin configuration$ curl http://127.0.0.1:9080/apisix/admin/routes/1 -H 'X-API-KEY: edd1c9f034335f136f87ad84b625c8f1' -X PUT -d '{    "plugins": {        "key-auth": {}    },    "upstream": {        "nodes": {            "127.0.0.1:1980": 1        },        "type": "roundrobin"    },    "uri": "/hello"}'
# Send a test request, the first two return to normal, did not reach the speed limit threshold$ curl http://127.0.0.1:9080/hello -H 'apikey: auth-one' -I...
$ curl http://127.0.0.1:9080/hello -H 'apikey: auth-one' -I...
# The third test returns 503 and the request is restricted$ curl http://127.0.0.1:9080/hello -H 'apikey: auth-one' -IHTTP/1.1 503 Service Temporarily Unavailable...
Use the consumer-restriction plug-in to restrict the access of Jack to this API.
# Add Jack to the blacklist$ curl http://127.0.0.1:9080/apisix/admin/routes/1 -H 'X-API-KEY: edd1c9f034335f136f87ad84b625c8f1' -X PUT -d '{    "plugins": {        "key-auth": {},        "consumer-restriction": {            "blacklist": [                "jack"            ]        }    },    "upstream": {        "nodes": {            "127.0.0.1:1980": 1        },        "type": "roundrobin"    },    "uri": "/hello"}'
# Repeated tests, all return 403; Jack is forbidden to access this API$ curl http://127.0.0.1:9080/hello -H 'apikey: auth-one' -IHTTP/1.1 403...
Global Rule#
Plugin just can be binded to Service or Route, if we want a Plugin work on all requests, how to do it?
We can register a global Plugin with GlobalRule:
curl -X PUT \ https://{apisix_listen_address}/apisix/admin/global_rules/1 \ -H 'Content-Type: application/json' \ -H 'X-API-KEY: edd1c9f034335f136f87ad84b625c8f1' \ -d '{ "plugins": { "limit-count": { "time_window": 60, "policy": "local", "count": 2, "key": "remote_addr", "rejected_code": 503 } } }'Now, the limit-count plugin will work on all requests
we can list all GlobalRule via admin api as below:
curl https://{apisix_listen_address}/apisix/admin/global_rulesPlugin Config#
To reuse common plugin configurations, you can extract them into a plugin config and bind it with a route directly.
For instance, you can do something like:
# create a plugin config$ curl http://127.0.0.1:9080/apisix/admin/plugin_configs/1 -H 'X-API-KEY: edd1c9f034335f136f87ad84b625c8f1' -X PUT -i -d '{    "desc": "blah",    "plugins": {        "limit-count": {            "count": 2,            "time_window": 60,            "rejected_code": 503        }    }}'
# bind it to route$ curl http://127.0.0.1:9080/apisix/admin/routes/1 -H 'X-API-KEY: edd1c9f034335f136f87ad84b625c8f1' -X PUT -i -d '{ "uris": ["/index.html"], "plugin_config_id": 1, "upstream": { "type": "roundrobin", "nodes": { "39.97.63.215:80": 1 } }}'When we can't find the corresponding plugin config with the id, the requests hit the route will be terminated with HTTP status code 503.
When a route already have plugins field configured, the plugins in the plugin config
will be merged into it. The same plugin in the plugin config will override one in the plugins.
For example,
{ "desc": "I am plugin_config 1", "plugins": { "ip-restriction": { "whitelist": [ "127.0.0.0/24", "113.74.26.106" ] }, "limit-count": { "count": 2, "time_window": 60, "rejected_code": 503 } }}{ "uris": ["/index.html"], "plugin_config_id": 1, "upstream": { "type": "roundrobin", "nodes": { "39.97.63.215:80": 1 } } "plugins": { "proxy-rewrite": { "uri": "/test/add", "scheme": "https", "host": "apisix.iresty.com" }, "limit-count": { "count": 20, "time_window": 60, "rejected_code": 503, "key": "remote_addr" } }}=
{ "uris": ["/index.html"], "upstream": { "type": "roundrobin", "nodes": { "39.97.63.215:80": 1 } } "plugins": { "ip-restriction": { "whitelist": [ "127.0.0.0/24", "113.74.26.106" ] }, "proxy-rewrite": { "uri": "/test/add", "scheme": "https", "host": "apisix.iresty.com" }, "limit-count": { "count": 2, "time_window": 60, "rejected_code": 503 } }}Debug mode#
Basic Debug Mode#
Enable basic debug mode just by setting apisix.enable_debug = true in conf/config.yaml file.
e.g Using both limit-conn and limit-count plugins for a /hello request, there will have a response header called Apisix-Plugins: limit-conn, limit-count.
$ curl http://127.0.0.1:1984/hello -iHTTP/1.1 200 OKContent-Type: text/plainTransfer-Encoding: chunkedConnection: keep-aliveApisix-Plugins: limit-conn, limit-countX-RateLimit-Limit: 2X-RateLimit-Remaining: 1Server: openresty
hello worldIf the information can be delivered via HTTP response header, for example, the plugin is in stream
subsystem, the information will be logged in the error log with warn level.
Advanced Debug Mode#
Enable advanced debug mode by modifying the configuration in conf/debug.yaml file. Because there will be a check every second, only the checker reads the #END flag, and the file would be considered as closed.
The checker would judge whether the file data changed according to the last modification time of the file. If there has any change, reload it. If there was no change, skip this check. So it's hot reload for enabling or disabling advanced debug mode.
| Key | Optional | Description | Default |
|---|---|---|---|
| hook_conf.enable | required | Enable/Disable hook debug trace. Target module function's input arguments or returned value would be printed once this option is enabled. | false |
| hook_conf.name | required | The module list name of hook which has enabled debug trace. | |
| hook_conf.log_level | required | Logging levels for input arguments & returned value. | warn |
| hook_conf.is_print_input_args | required | Enable/Disable input arguments print. | true |
| hook_conf.is_print_return_value | required | Enable/Disable returned value print. | true |
Example:
hook_conf:  enable: false # Enable/Disable Hook Debug Trace  name: hook_phase # The Module List Name of Hook which has enabled Debug Trace  log_level: warn # Logging Levels  is_print_input_args: true # Enable/Disable Input Arguments Print  is_print_return_value: true # Enable/Disable Returned Value Print
hook_phase: # Module Function List, Name: hook_phase  apisix: # Referenced Module Name    - http_access_phase # Function Names:Array    - http_header_filter_phase    - http_body_filter_phase    - http_log_phase#END